Python 函数编写学习笔记
2020-03-24
- 使用 RMarkdown 的
child参数,进行文档拼接。 - 这样拼接以后的笔记方便复习。
- 相关问题提交到 GitHub
1 前言
参考 Miel (2019) 学习 docstring 书写、textmanger 使用、decorators (装饰器)使用。
- docstrings 就是函数的 help 文档。
- textmanger 就是 with 大家一个对象的使用方式,它也是一个装饰器的调用。
- decorators 类似于 func of func
- know when you need to turn a chunk of code into a function.
- You will also learn the details of how Python passes arguments to functions,
- as well as some common gotchas that can cause debugging headaches when calling functions.
知道 script => function 的转化过程。
1.1 Decorators
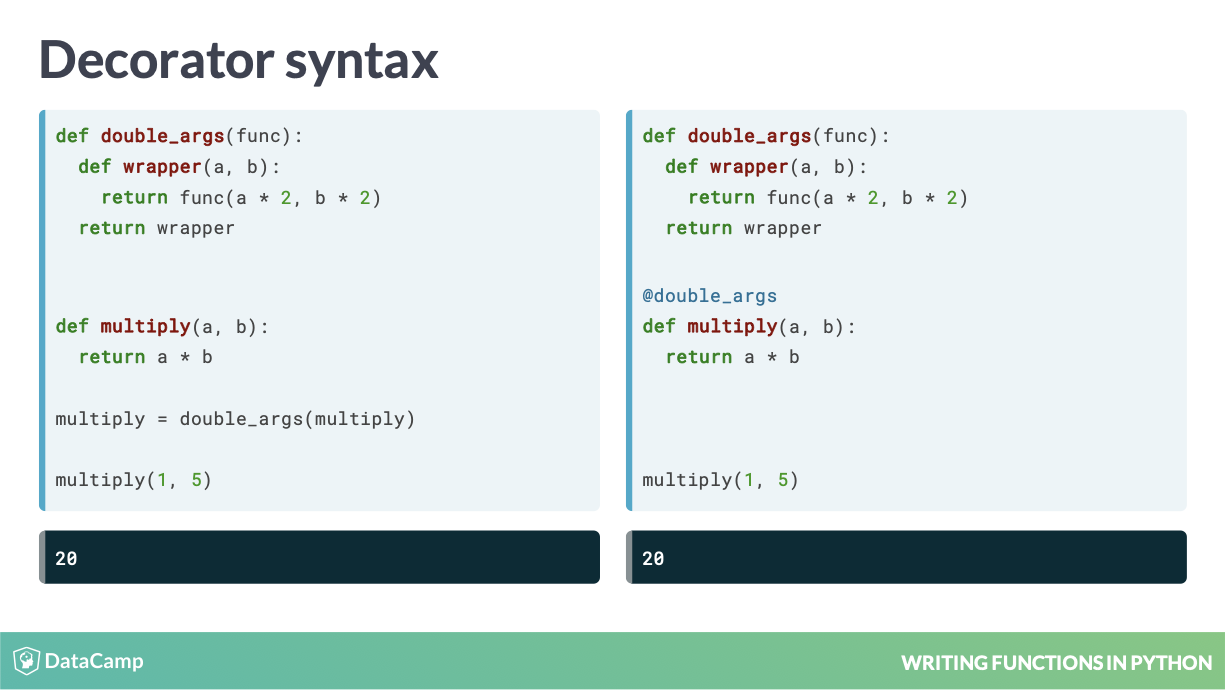
装饰器的愈语法
Note that in Python, you can pass a function as an argument to another function. (Miel 2019)
函数名称也可以作为参数,这和 R 一样。
2 安装和更新
3 函数
3.1 Docstrings
3.1.1 Anatomy of a docstring
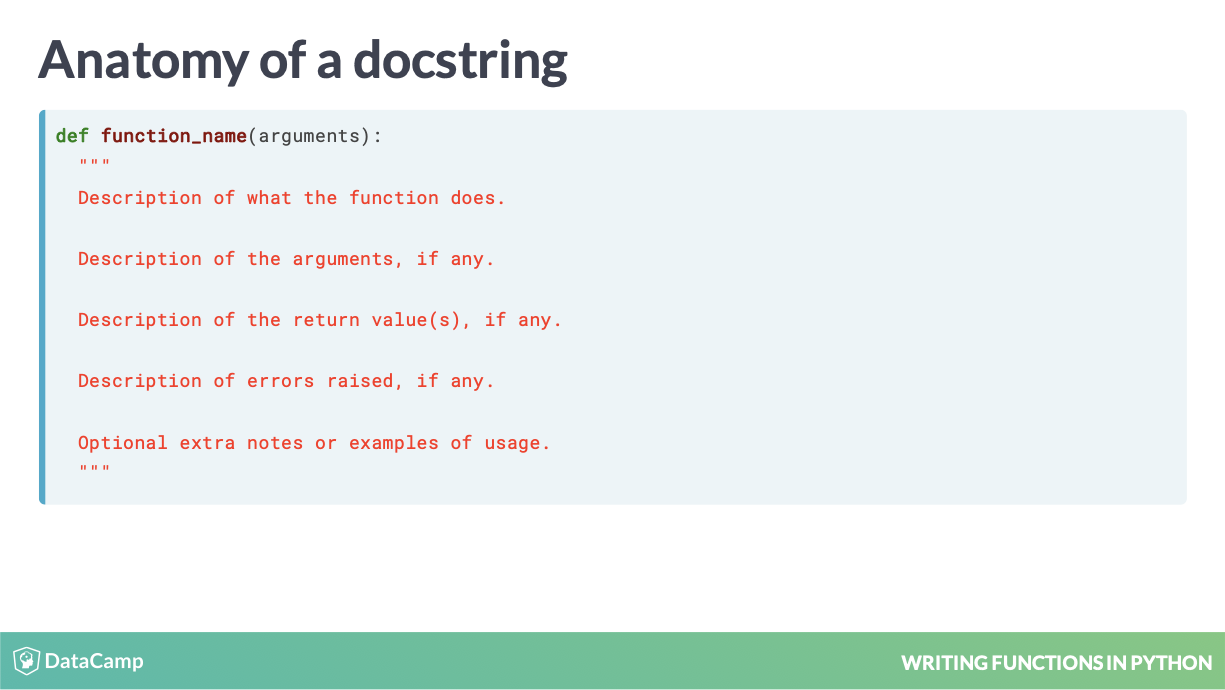
docstring 的组成部分
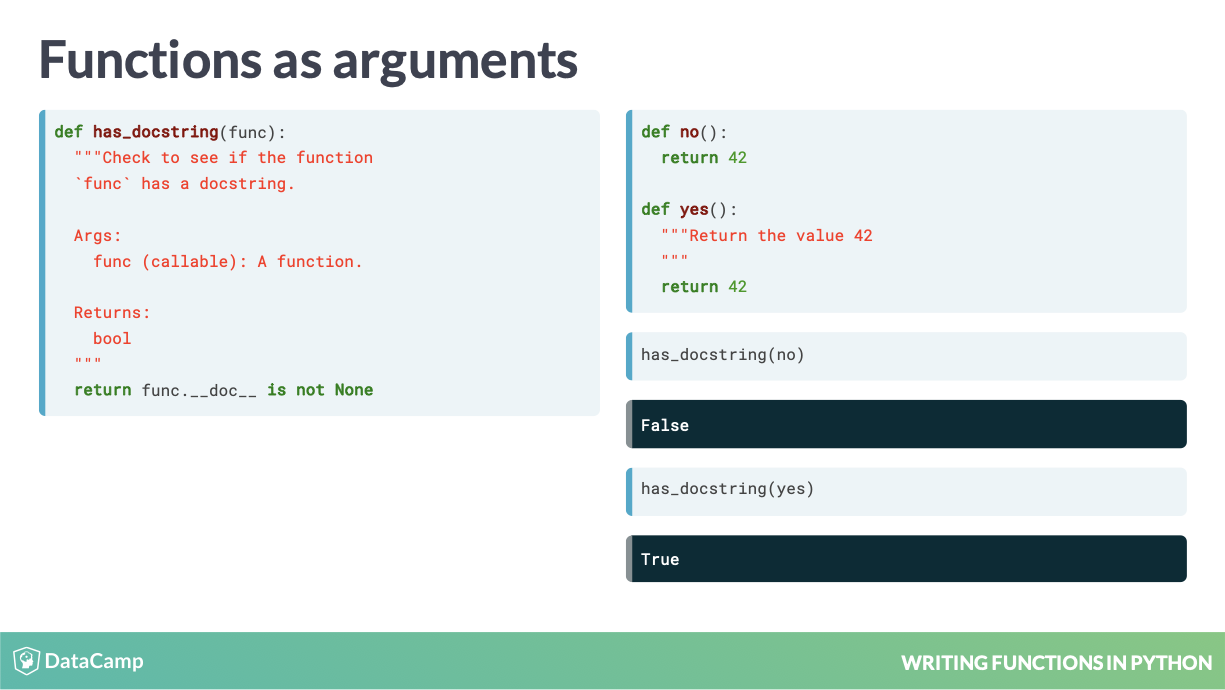
has_docstring 这个函数很巧妙。
3.1.2 Google Style
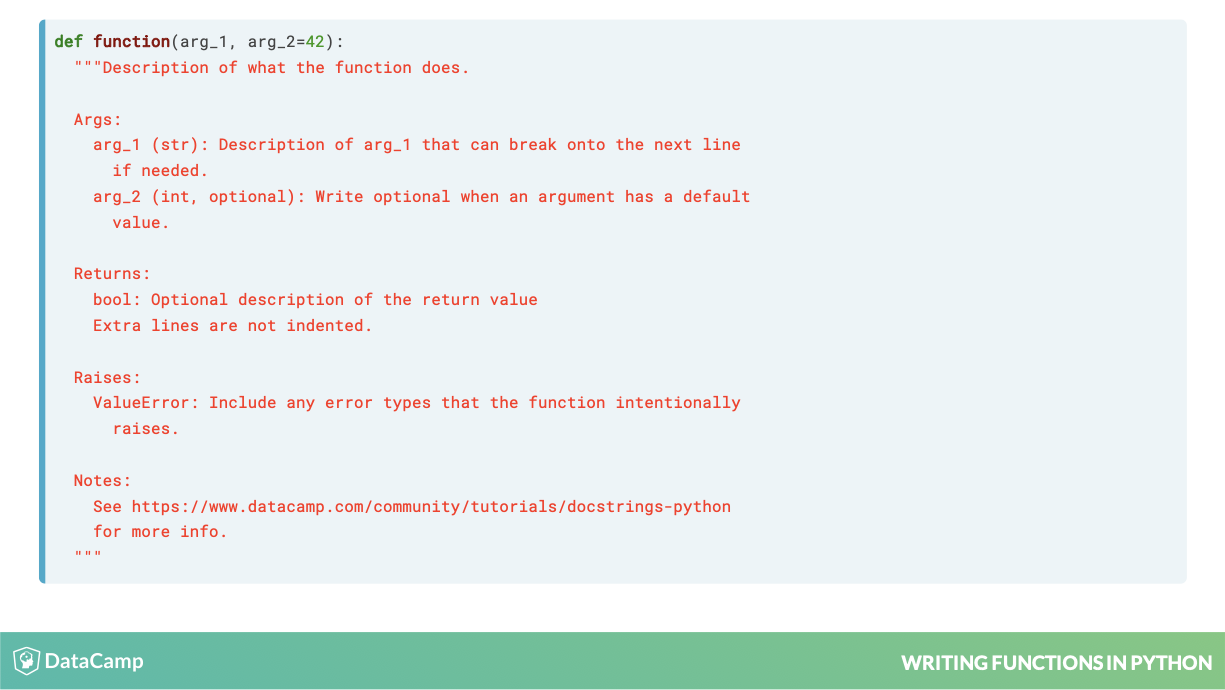
Google Style 模版
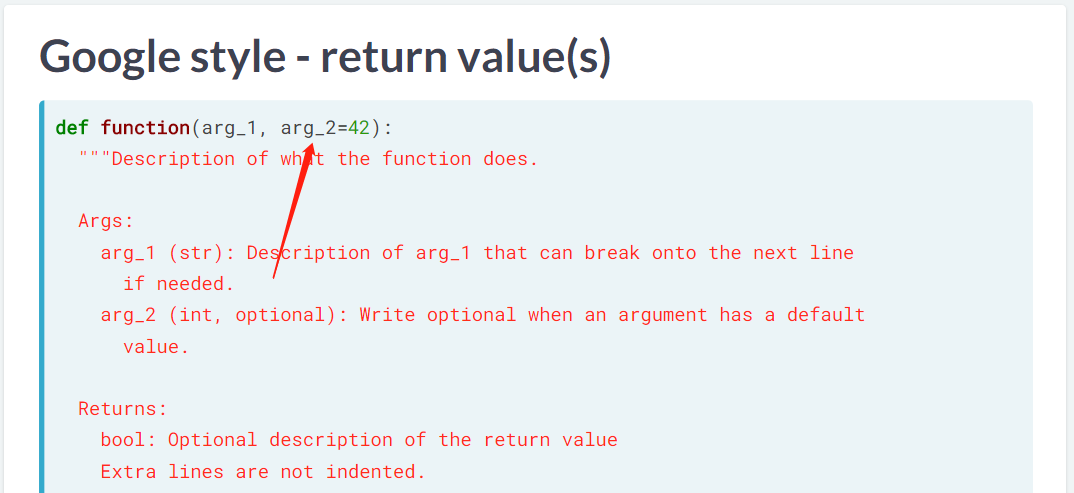
命令式表达
This should be in imperative language. (Miel 2019)
Google Style 中的描述部分是命令式的 (imperative language),而不是描述式的。
如,
- Split the data frame and stack the columns
- 而不是 This function will split the data frame and stack the columns
如果有 default value,这里要选择 optional。
def count_letter(content, letter):
  """Count the number of times `letter` appears in `content`.

  Args:
    content (str): The string to search.
    letter (str): The letter to search for.

  Returns:
    int

  # Add a section detailing what errors might be raised
  Raises:
    ValueError: If `letter` is not a one-character string.
  """
  if (not isinstance(letter, str)) or len(letter) != 1:
    raise ValueError('`letter` must be a single character string.')
  return len([char for char in content if char == letter])
注意是 Returns,加上s
前面这种都是 Google Style。
Numpydoc 会加上 --------
3.1.3 Numpydoc
 ### 查看 docstring
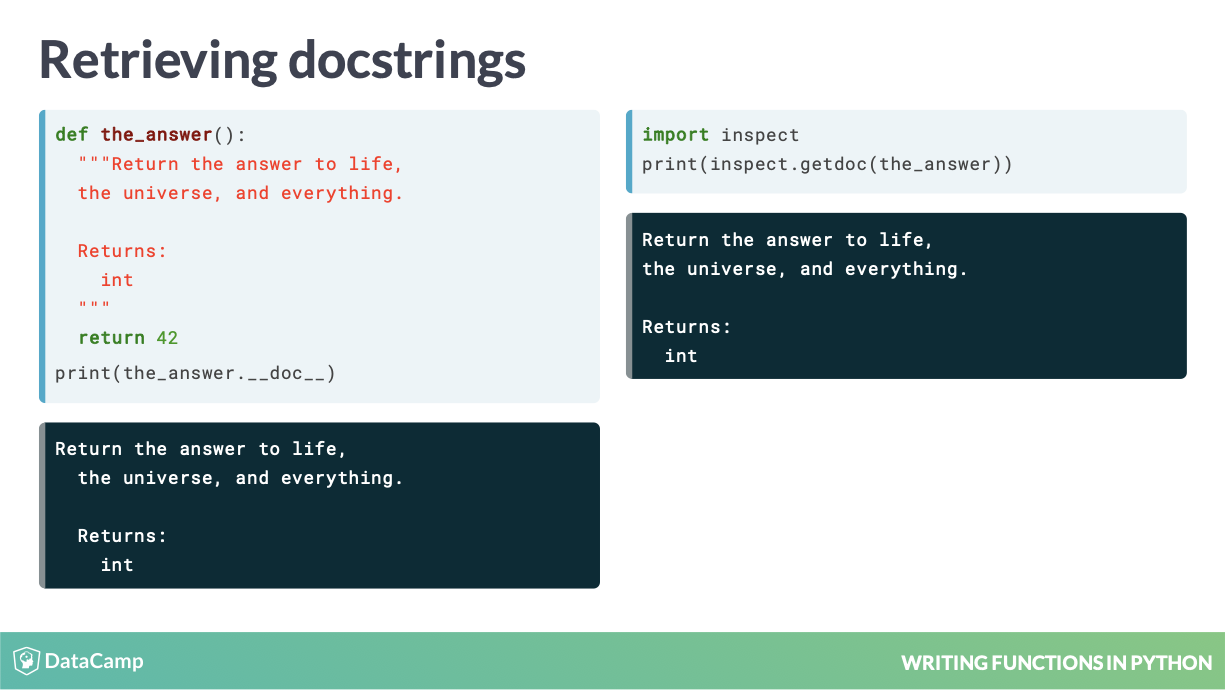
the_answer.__doc__ 可以查看。
后面一种更美观。
# Get the docstring with an attribute of count_letter()
docstring = count_letter.__doc__

border = '#' * 28
print('{}\n{}\n{}'.format(border, docstring, border))
这种表达
非常适合打日志!
In [9]:
# Get the docstring with an attribute of count_letter()
docstring = count_letter.__doc__
border = '#' * 28
print('{}\n{}\n{}'.format(border, docstring, border))
############################
Count the number of times `letter` appears in `content`.
Args:
content (str): The string to search.
letter (str): The letter to search for.
Returns:
int
Raises:
ValueError: If `letter` is not a one-character string.
############################In [10]: import inspect
# Get the docstring with a function from the inspect module
docstring = inspect.getdoc(count_letter)
border = '#' * 28
print('{}\n{}\n{}'.format(border, docstring, border))
############################
Count the number of times `letter` appears in `content`.
Args:
content (str): The string to search.
letter (str): The letter to search for.
Returns:
int
Raises:
ValueError: If `letter` is not a one-character string.
############################Notice how the
count_letter.__doc__version of the docstring had strange whitespace at the beginning of all but the first line. That’s because the docstring is indented to line up visually when reading the code. But when we want to print the docstring, removing those leading spaces withinspect.getdoc()will look much better.
其实两者没有太大差异。只是前者第一行很奇怪的没有缩进,但是其他行都缩进了。
3.1.4 自定义函数
def build_tooltip(function):
  """Create a tooltip for any function that shows the
  function's docstring.

  Args:
    function (callable): The function we want a tooltip for.

  Returns:
    str
  """
  # Use 'inspect' to get the docstring
  docstring = inspect.getdoc(function)
  border = '#' * 28
  return '{}\n{}\n{}'.format(border, docstring, border)

print(build_tooltip(count_letter))
print(build_tooltip(range))
print(build_tooltip(print))
3.3 DOT 原则
3.4 Do One Thing
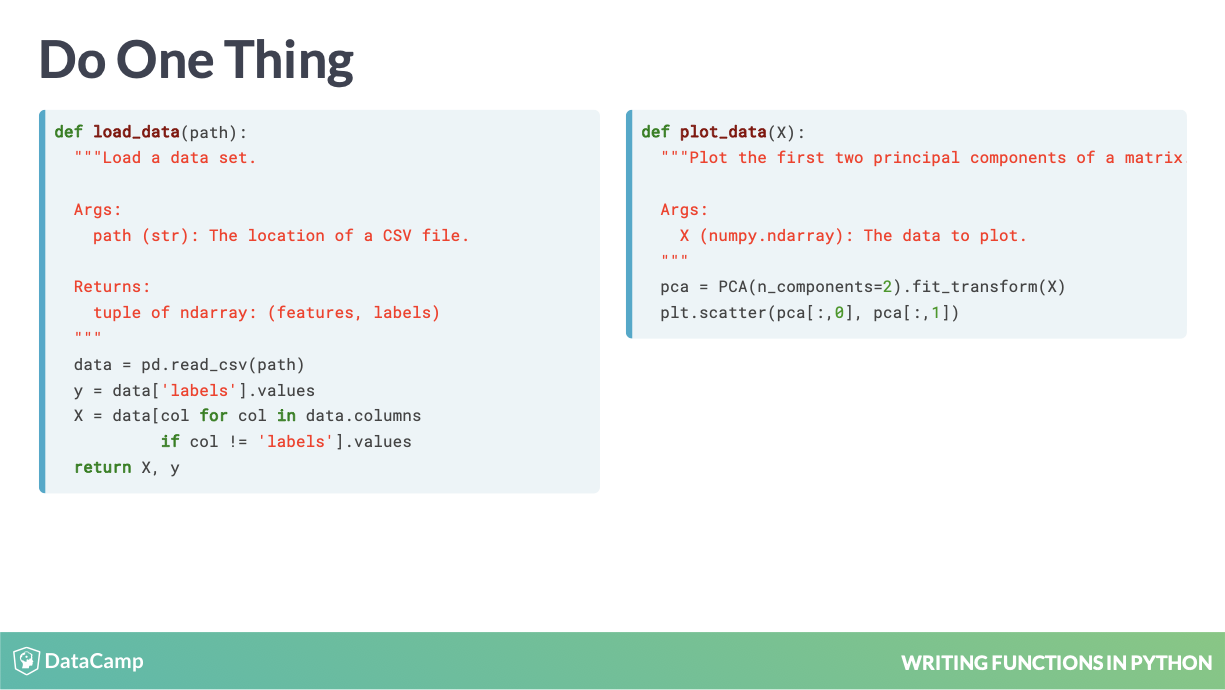
不要让功能放在一起。
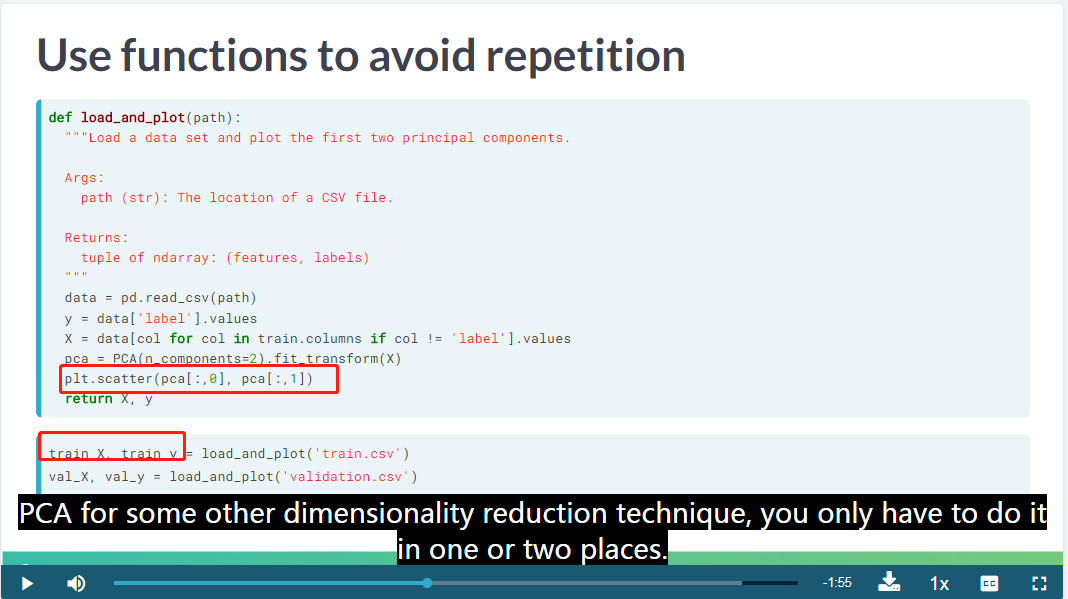
DOT 原则错误示范
这个函数好在于,先花了图,完成了EDA,又反馈了的 X 和 y。
这样不好,Do one thing
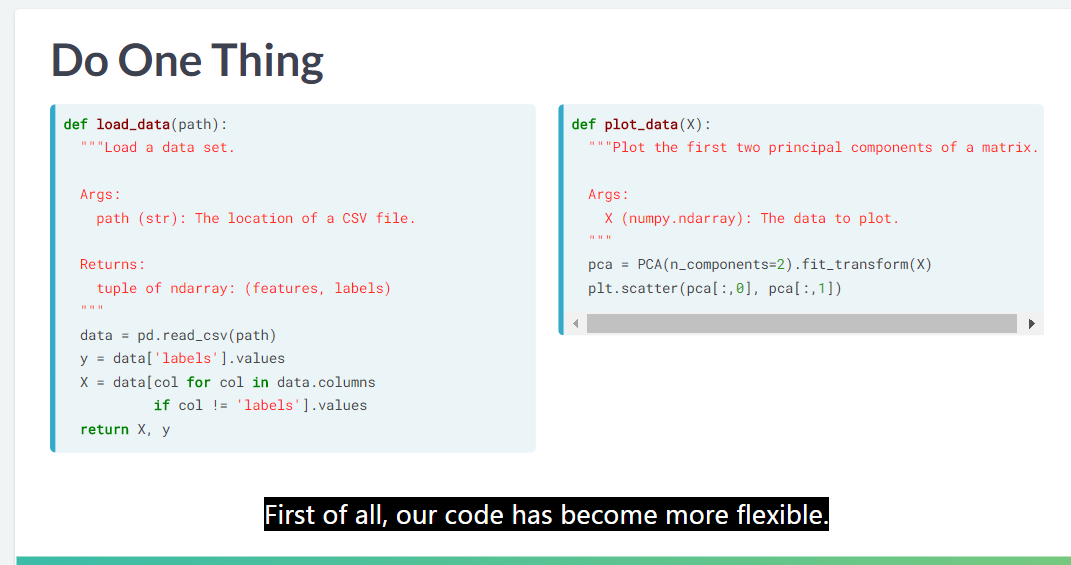
DOT 原则正确示范
把他们分开。注意这里分离两个变量的方法,很地道。
这里以 R 一个函数为例。
3.5 code smells
code smells = refactor = improve the code by changing a little bit at a time. (Martin Fowler)
refactor 英 [ri’fæktə] n. 重构 翻译得不是很好!
def standardize(column):
  """Standardize the values in a column.

  Args:
    column (pandas Series): The data to standardize.

  Returns:
    pandas Series: the values as z-scores
  """
  # Finish the function so that it returns the z-scores
  z_score = (column - column.mean()) / column.std()
  return z_score

# Use the standardize() function to calculate the z-scores
df['y1_z'] = standardize(df.y1_gpa)
df['y2_z'] = standardize(df.y2_gpa)
df['y3_z'] = standardize(df.y3_gpa)
df['y4_z'] = standardize(df.y4_gpa)
def mean(values):
  """Get the mean of a list of values

  Args:
    values (iterable of float): A list of numbers

  Returns:
    float
  """
  # Write the mean() function
  mean = sum(values)/len(values)
  return mean
def median(values):
"""Get the median of a list of values
Args:
values (iterable of float): A list of numbers
Returns:
float
"""
# Write the median() function
midpoint = int(len(values)/2)
if len(values) % 2 == 0:
median = (values[midpoint - 1] + values[midpoint]) / 2
else:
median = values[midpoint]
return median不要把 mean 和 median 放在一起!
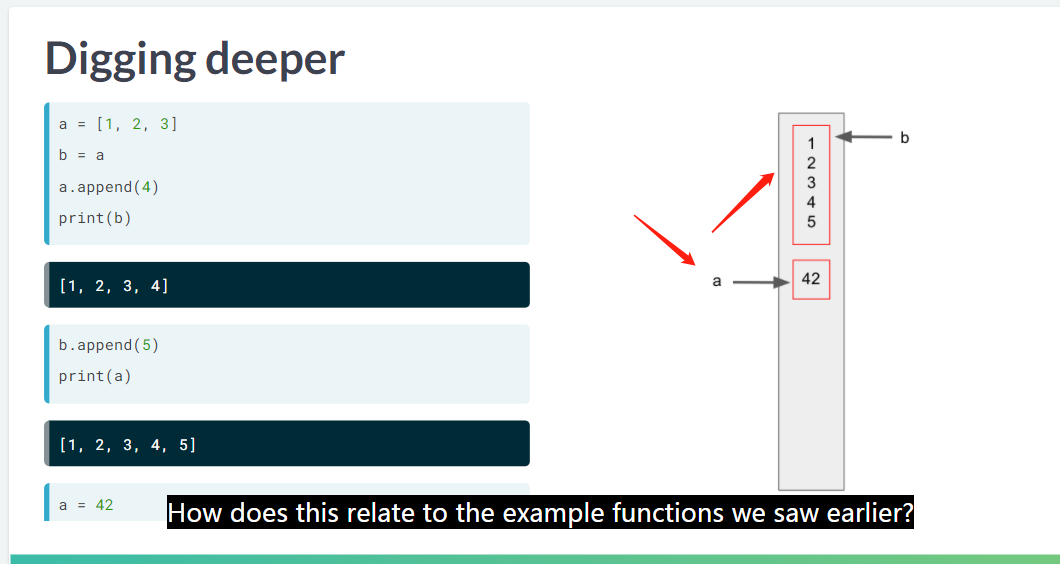
3.6 Pass by assignment
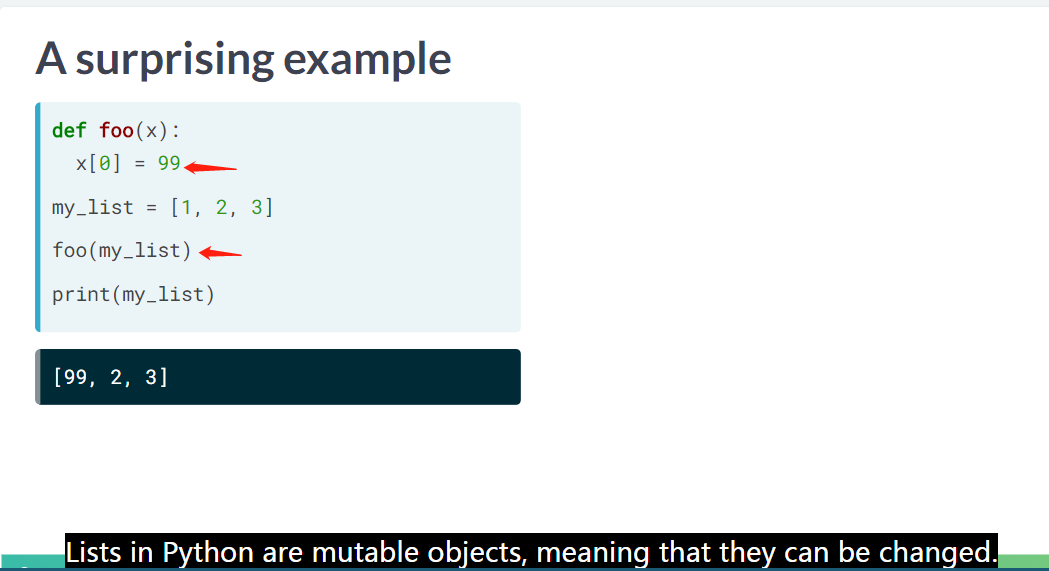
设置参数
list in Python is a mutatable object,
所以在函数内部被改变了!
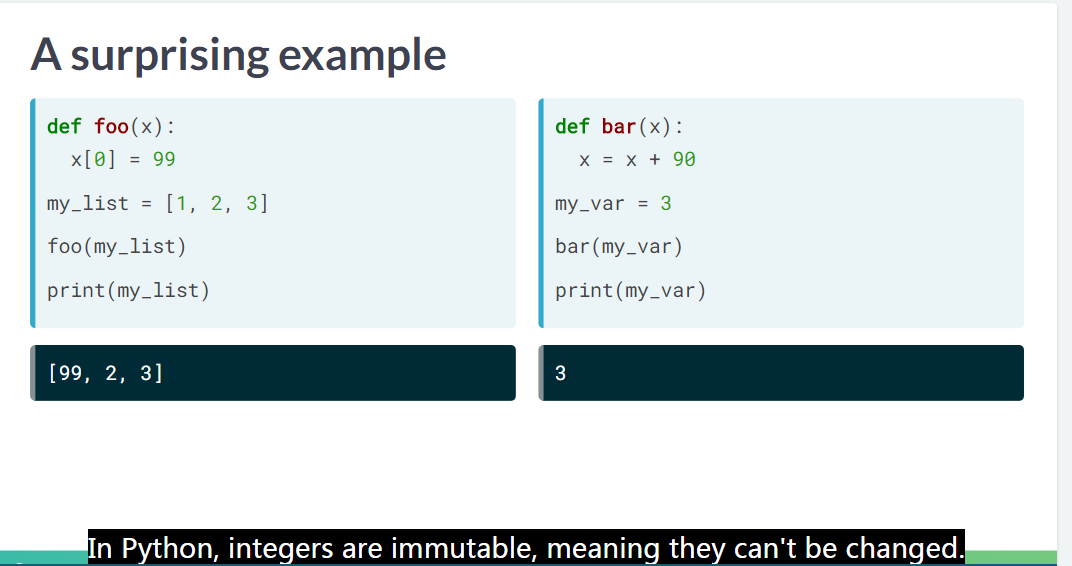
int 是不修改的
But integer is immutable
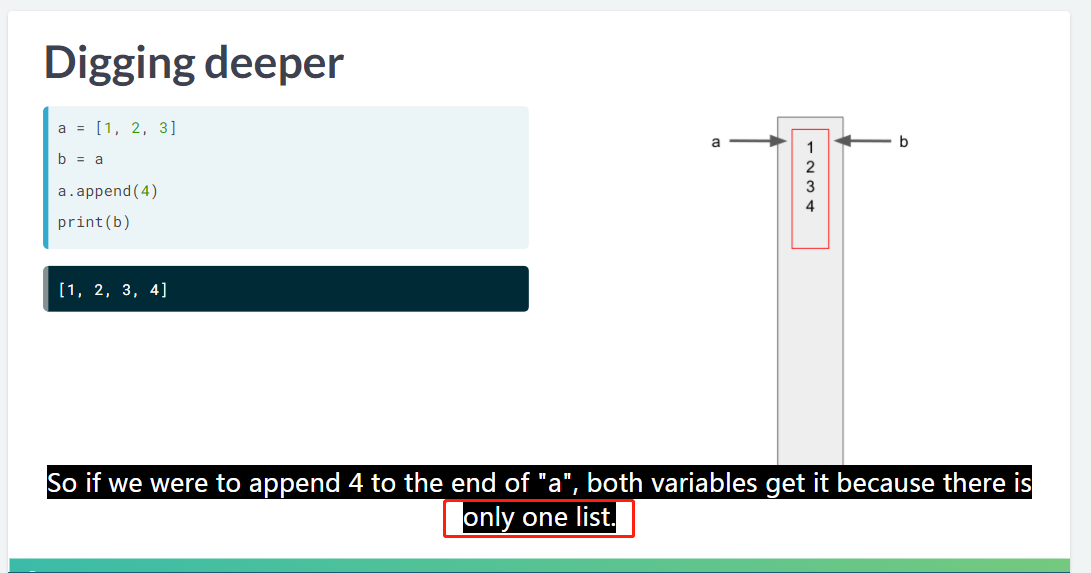
int 和 list 对比
这里只有一个 list。
但是当 a = 4 时,b = a,a 改变,b不会随着改变了!
int 和 list 对比
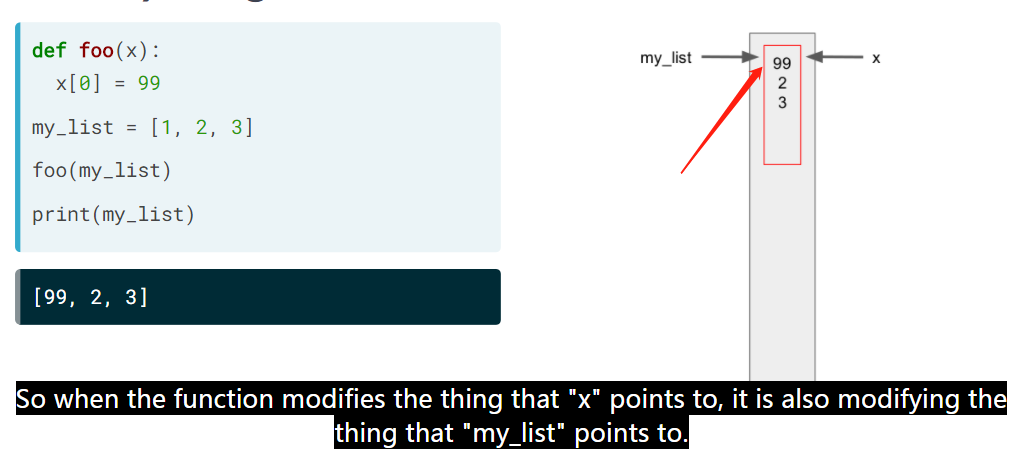
int 和 list 对比
这是同一个 list。
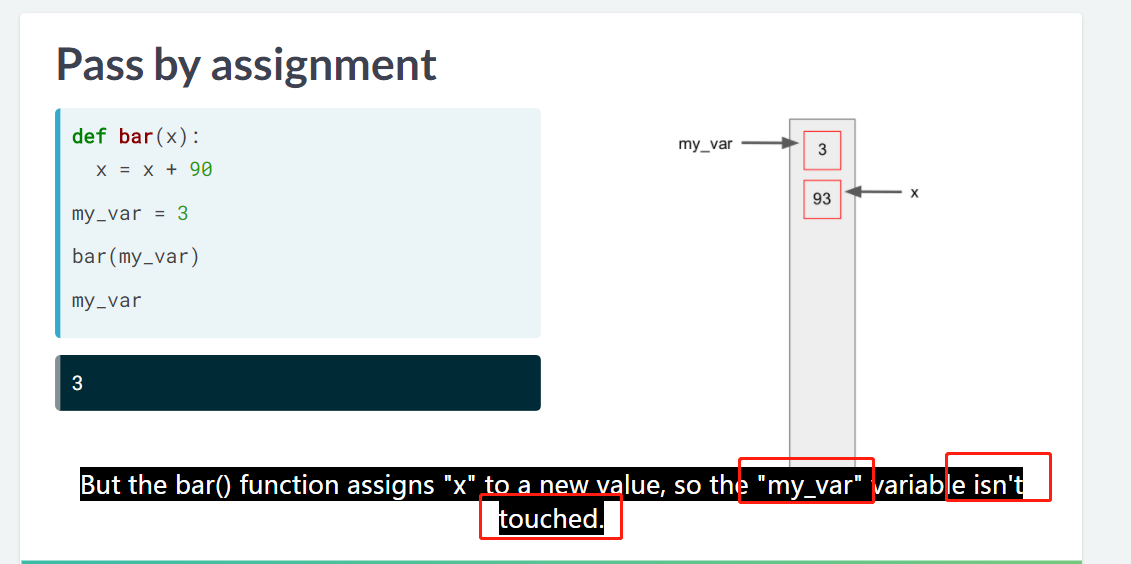
int 和 list 对比
这里 my_var 是不可以 touched,所以不会改变!
def store_lower(_dict, _string):
  """Add a mapping between `_string` and a lowercased version of `_string` to `_dict`

  Args:
    _dict (dict): The dictionary to update.
    _string (str): The string to add.
  """
  orig_string = _string
  _string = _string.lower()
  _dict[orig_string] = _string

d = {}
s = 'Hello'

store_lower(d, s)
扩展,dict 可变,string 不可变。
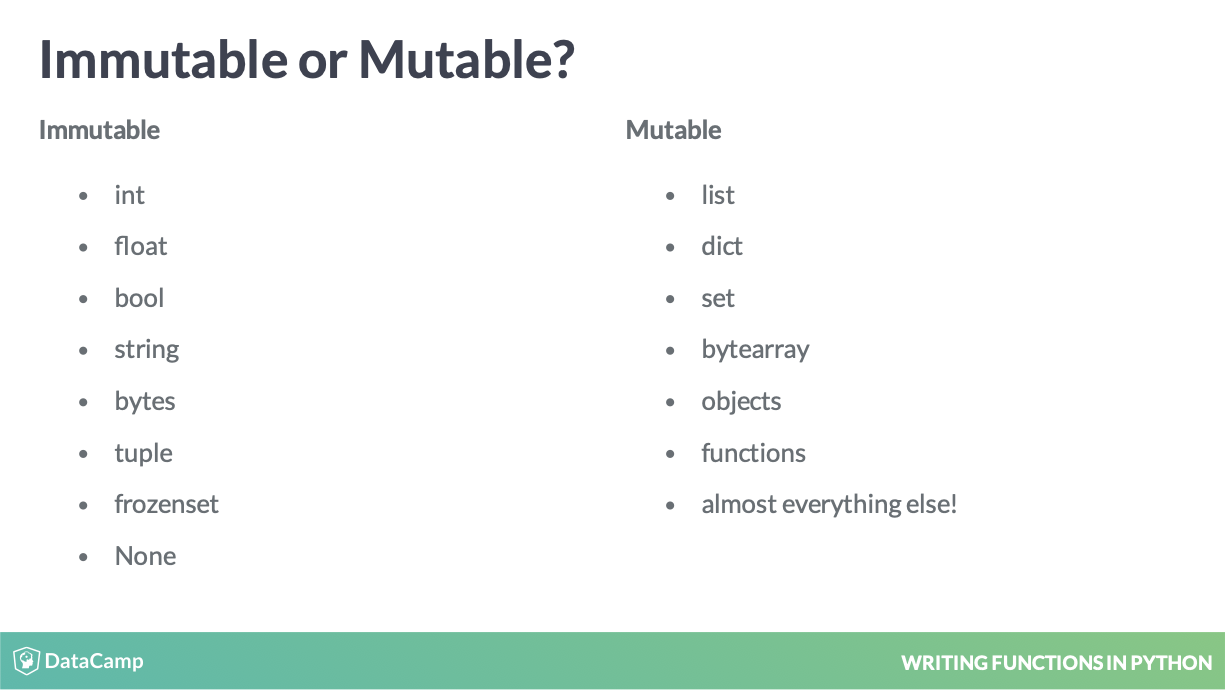
Python 可变和不可变统计
Beautiful and best practice! When you need to set a mutable variable as a default argument, always use None and then set the value in the body of the function. This prevents unexpected behavior like adding multiple columns if you call the function more than once. (Miel 2019)
而且从业务角度,一般都是 df 会改变的。
# Use an immutable variable for the default argument
def better_add_column(values, df=None):
  """Add a column of `values` to a DataFrame `df`.
  The column will be named "col_<n>" where "n" is
  the numerical index of the column.

  Args:
    values (iterable): The values of the new column
    df (DataFrame, optional): The DataFrame to update.
      If no DataFrame is passed, one is created by default.

  Returns:
    DataFrame
  """
  # Update the function to create a default DataFrame
  if df is None:
    df = pandas.DataFrame()
  df['col_{}'.format(len(df.columns))] = values
  return df
4 Context Manager
4.1 text manager
Context managers are a convenient way to provide connections in Python and guarantee that those connections get cleaned up when you are done using them. (Miel 2019)
- Sets up a context
- Runs your code
- Removes the context
text manager 更像是一个数据库连接的方式,connect 和 disconnect 两个配置。
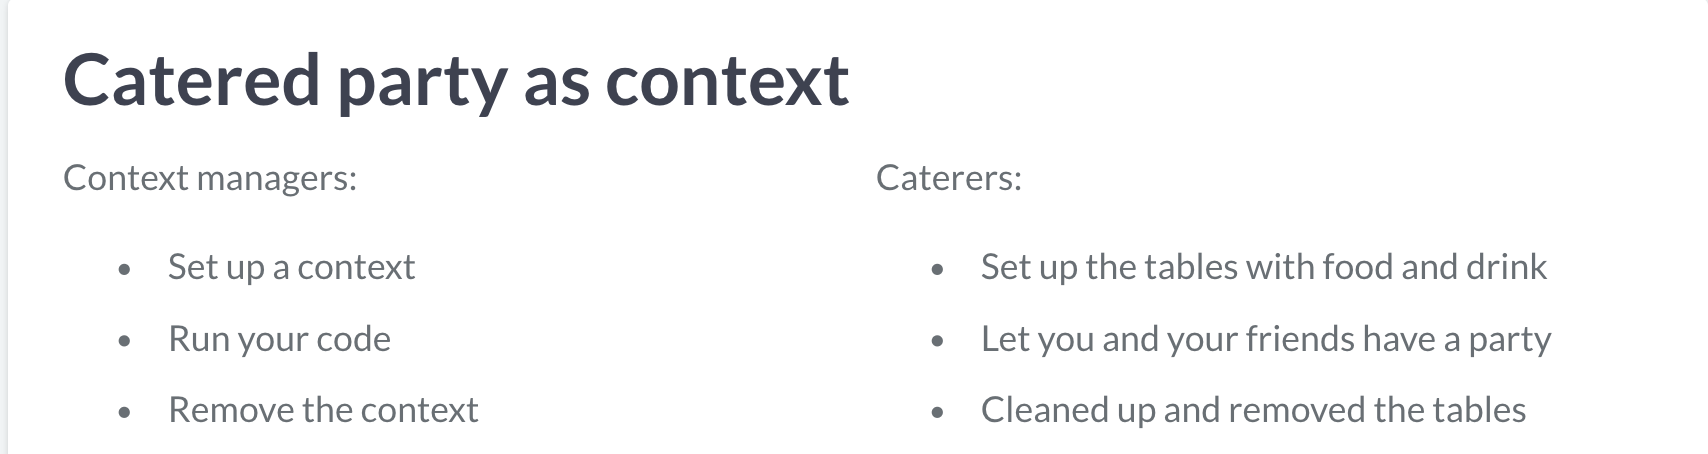
很好的比喻。
image
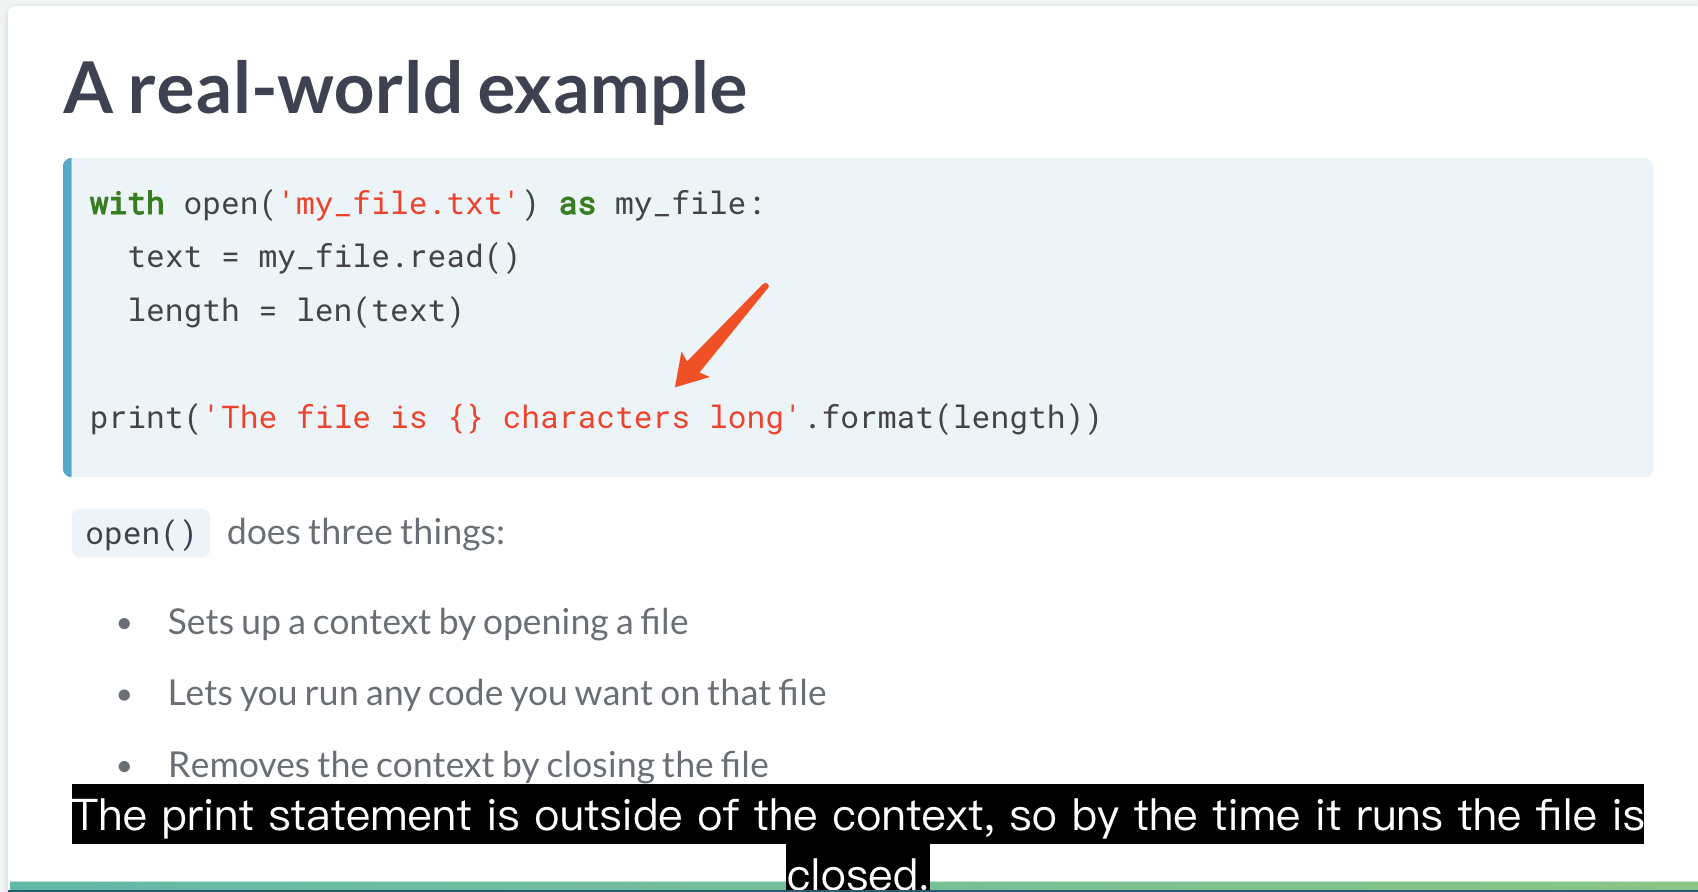
中间的 code 定义为 compound statements。 compound statements 中有 if 函数,有 for 循环,都是适用的。
在这里,print is outisde 因此 file 已经关闭,但是length已经定义了。
从这一步开始,with 就关闭了。
# Open "alice.txt" and assign the file to "file"
with open('alice.txt') as file:
  text = file.read()

n = 0
for word in text.split():
  if word.lower() in ['cat', 'cats']:
    n += 1

print('Lewis Carroll uses the word "cat" {} times'.format(n))
统计有多少 cats
4.2 简单编译
In [2]: timer??
Signature: timer()
Source:
@contextlib.contextmanager
def timer():
  """Time how long code in the context block takes to run."""
  t0 = time.time()
  try:
      yield
  except:
    raise
  finally:
    t1 = time.time()
    print('Elapsed: {:.2f} seconds'.format(t1 - t0))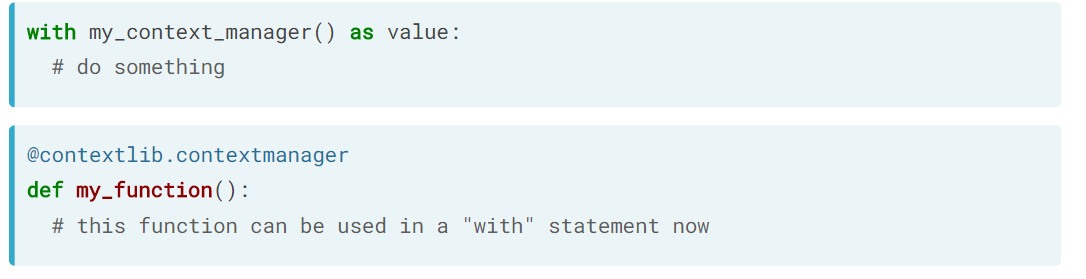
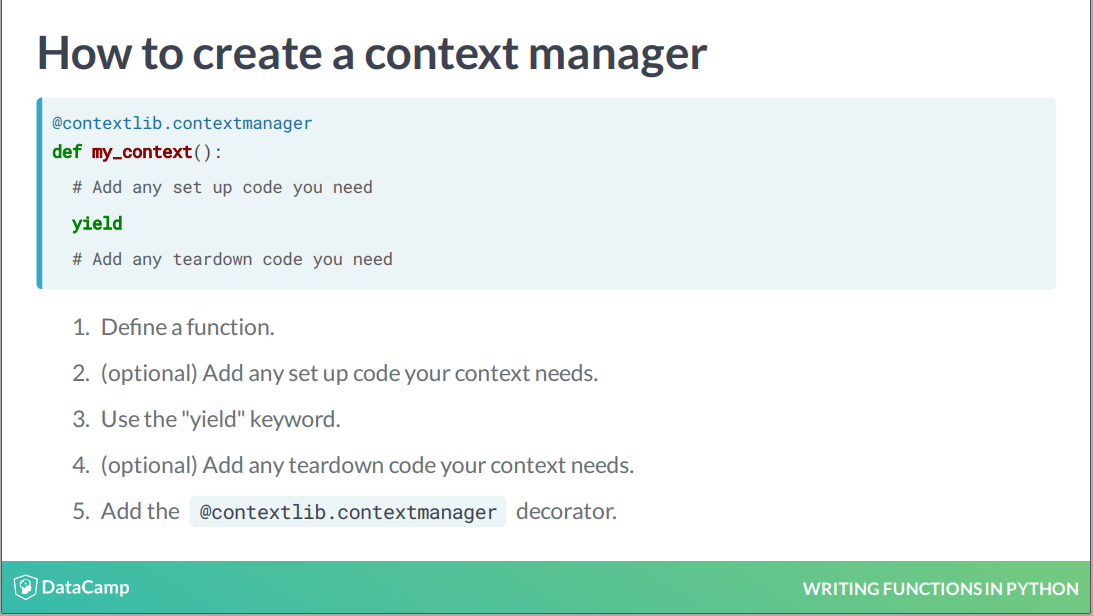
所以发现 contextlib 这里充当装饰器了!因为就是修改函数的表达!
image = get_image_from_instagram()

# Time how long process_with_numpy(image) takes to run
with timer():
  print('Numpy version')
  process_with_numpy(image)

# Time how long process_with_pytorch(image) takes to run
with timer():
  print('Pytorch version')
process_with_pytorch(image)<script.py> output:
Numpy version
Processing..........done!
Elapsed: 1.52 seconds
Pytorch version
Processing..........done!
Elapsed: 0.33 seconds显然 pytorch 更好!
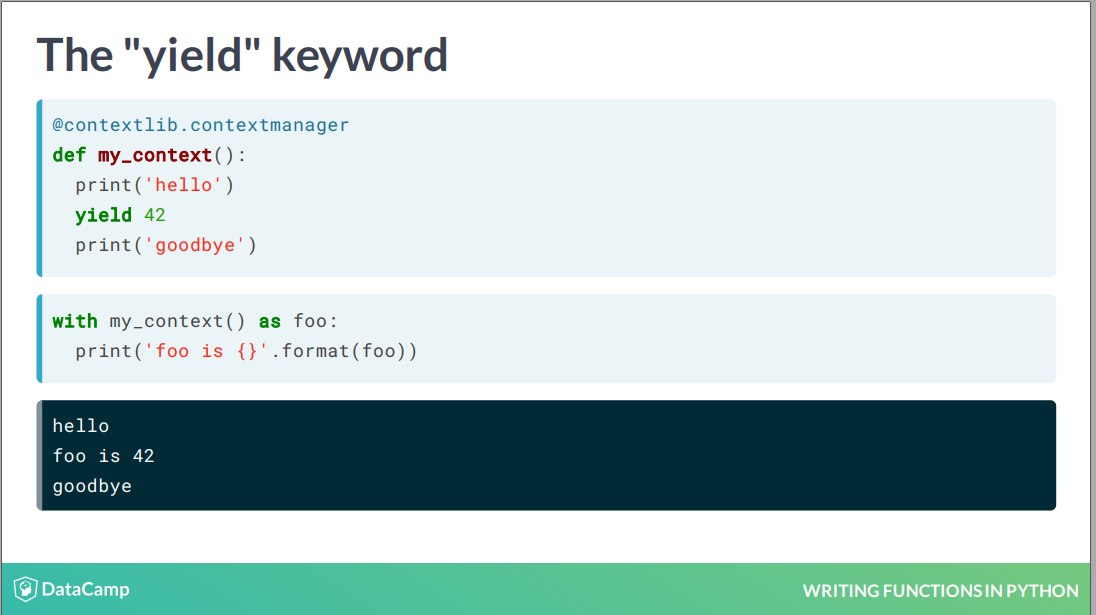
You may have noticed there was no as
at the end of the with the statement in timer() context manager. That is because timer()is a context manager that does not return a value, so the asat the end of the with statement isn’t necessary. (Miel 2019)
因为 text manager 不 return value,因此不需要 as xxx。
注意这里的 text manager 配置,实际上是靠装饰器@contextlib.contextmanager完成的。
Two ways to define a context manager
- Class-based
- Function-based
这里目前只讨论 func-based
一个很好的例子

yield 之后的函数是 teardown 的,一般是类似于 disconnect 的函数。
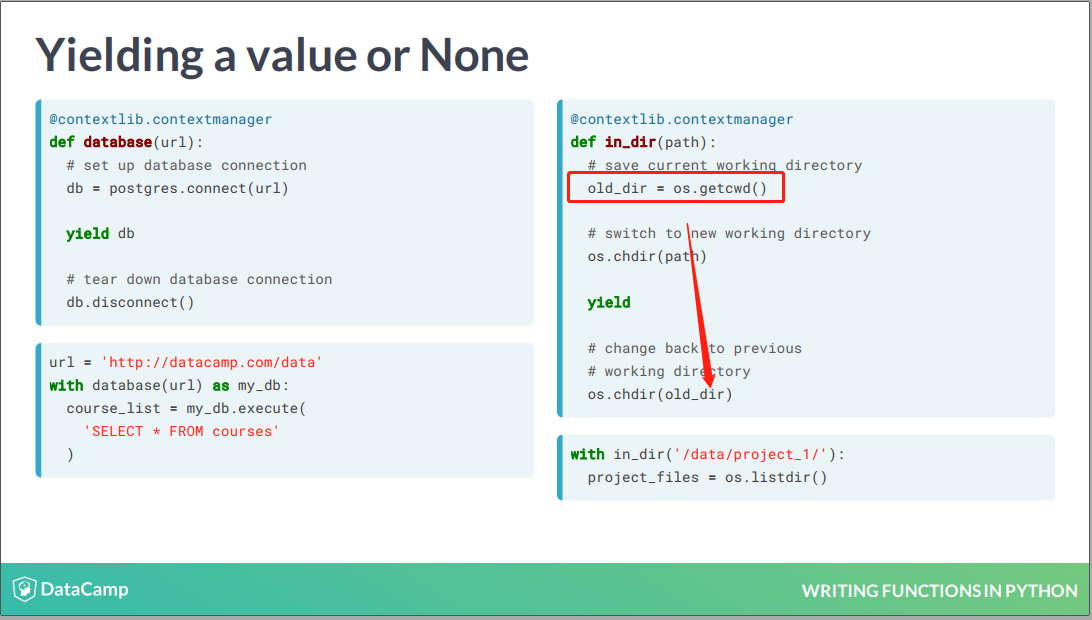
数据库的断开连接和路径的切换回来都是很好的例子。
# Add a decorator that will make timer() a context manager
@contextlib.contextmanager
def timer():
  """Time the execution of a context block.

  Yields:
    None
  """
  start = time.time()
  # Send control back to the context block
  yield
  end = time.time()
  print('Elapsed: {:.2f}s'.format(end - start))

with timer():
  print('This should take approximately 0.25 seconds')
  time.sleep(0.25)
does not return an explicit value, so yield is written by itself without specifying anything to return.
这里 yield 啥也没有,因此就是 NULL。
4.3 主要应用
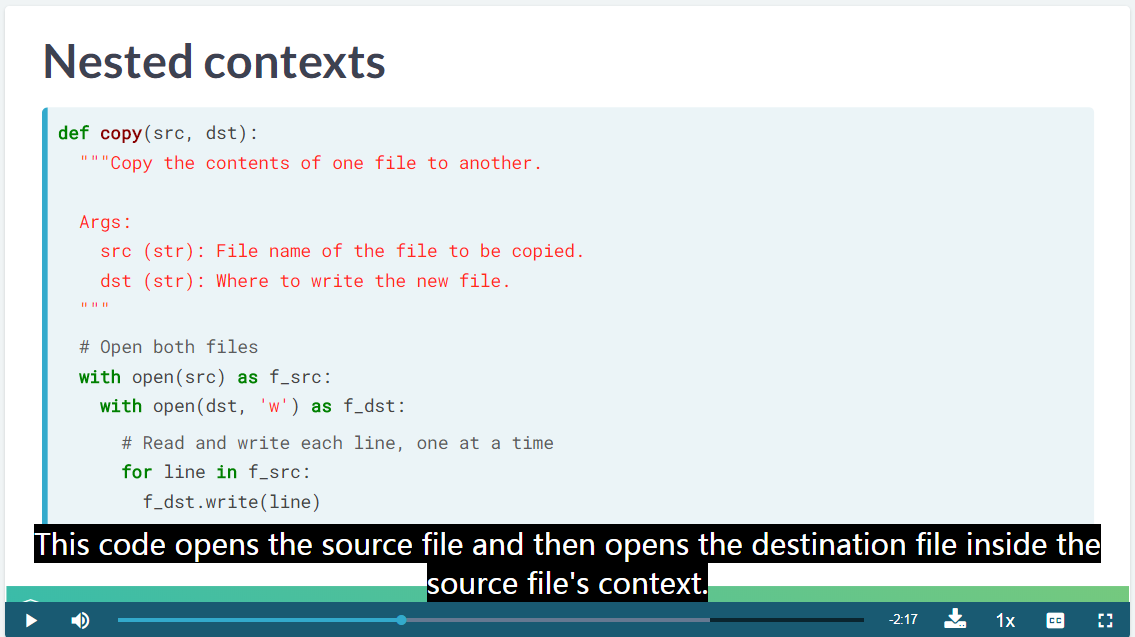
稳定地复制文件
Nested context 一行行的写,比完整导入强多了!
# Use the "stock('NVDA')" context manager
# and assign the result to the variable "nvda"
with stock('NVDA') as nvda:
  # Open "NVDA.txt" for writing as f_out
  with open('NVDA.txt', 'w') as f_out:
    for value in range(10):
      value = nvda.price()
      print('Logging ${:.2f} for NVDA'.format(value))
      f_out.write('{:.2f}\n'.format(value))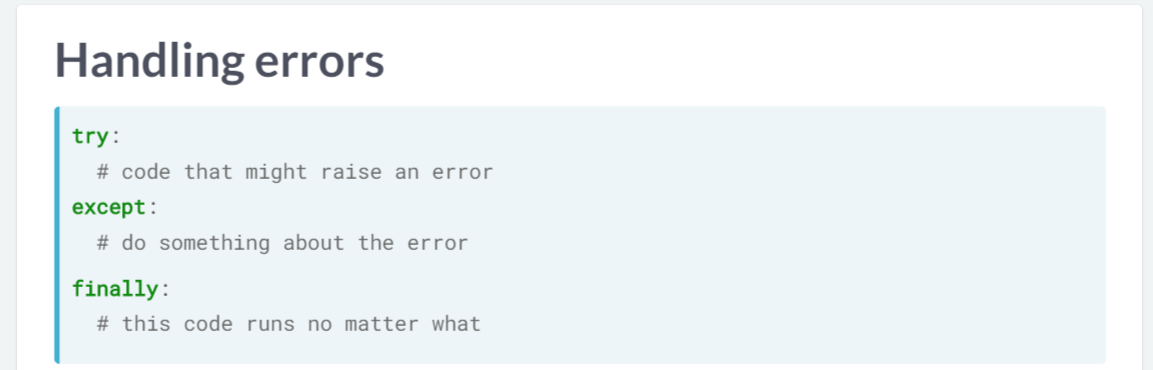
try, except, finally 给产生报错时使用!
def in_dir(directory):
  """Change current working directory to `directory`,
  allow the user to run some code, and change back.

  Args:
    directory (str): The path to a directory to work in.
  """
  current_dir = os.getcwd()
  os.chdir(directory)

  # Add code that lets you handle errors
  try:
    yield
  # Ensure the directory is reset,
  # whether there was an error or not
  finally:
    os.chdir(current_dir)
到一个特定的路径做事情,做完了再切换回来!
in_dir() is a great example of the CHANGE/RESET pattern that indicates you should use a context manager.
这就回答了为什么要使用 text manager! 总结下来,context manager 更像是“试试“的函数
5 装饰器
装饰器也是一种函数,把函数看成对象进行修改。
5.1 Functions are objects
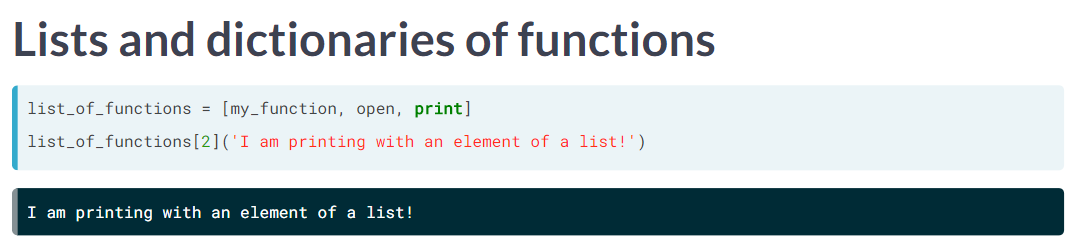
这是把函数当成对象,最好的例子,都放到一个 list 了!
并且选出 list 的其中一个对象,进行函数运算,非常的自由。
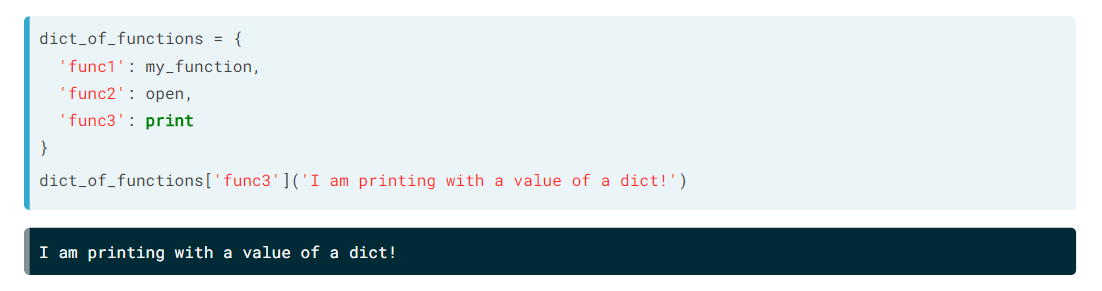
函数还可以放到 dict 当中。
也可以进行对象调用,实现函数运算。
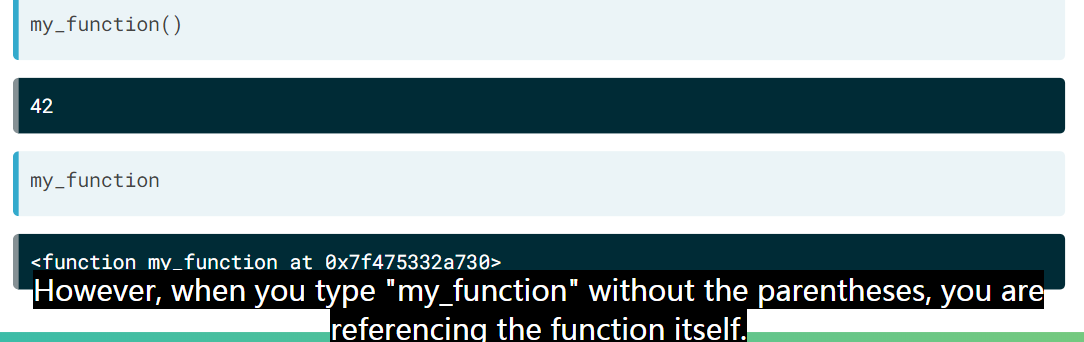
函数的执行和引用
不加() (parentheses) 那么是 reference 函数,常用于a = b,加上了就是 evaluate (执行)了!
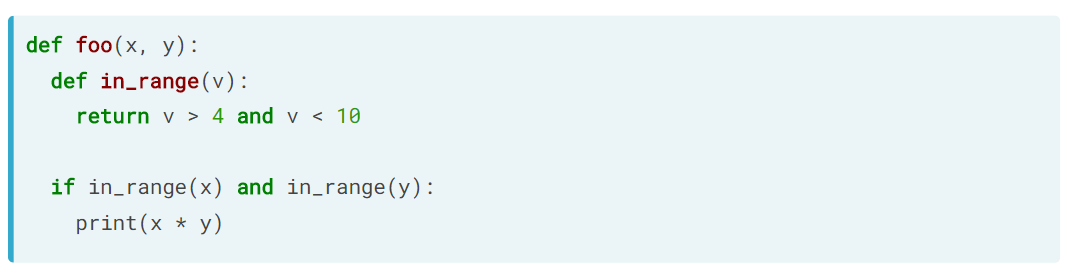
nested function 在装饰器后期应用很多。
如函数 has_docstring
5.2 Scope
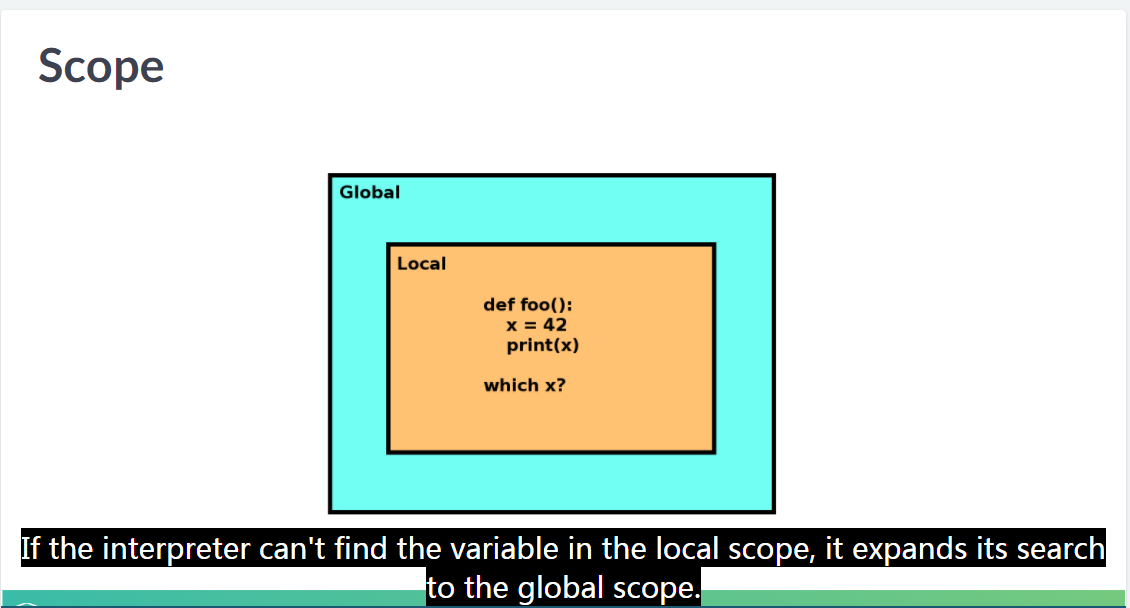
greedy searching like R scope
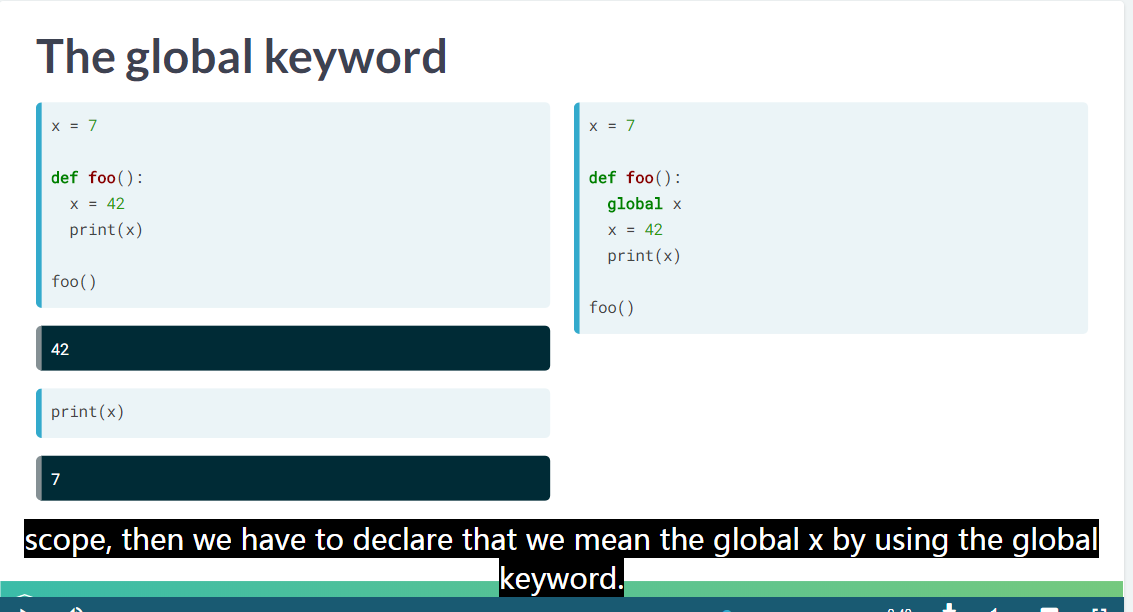
修改全局变量需要增加 global 参数
真的想要修改,必须在函数内部加上 global 这个参数。
顺序为 local => nonlocal => global => built-in。
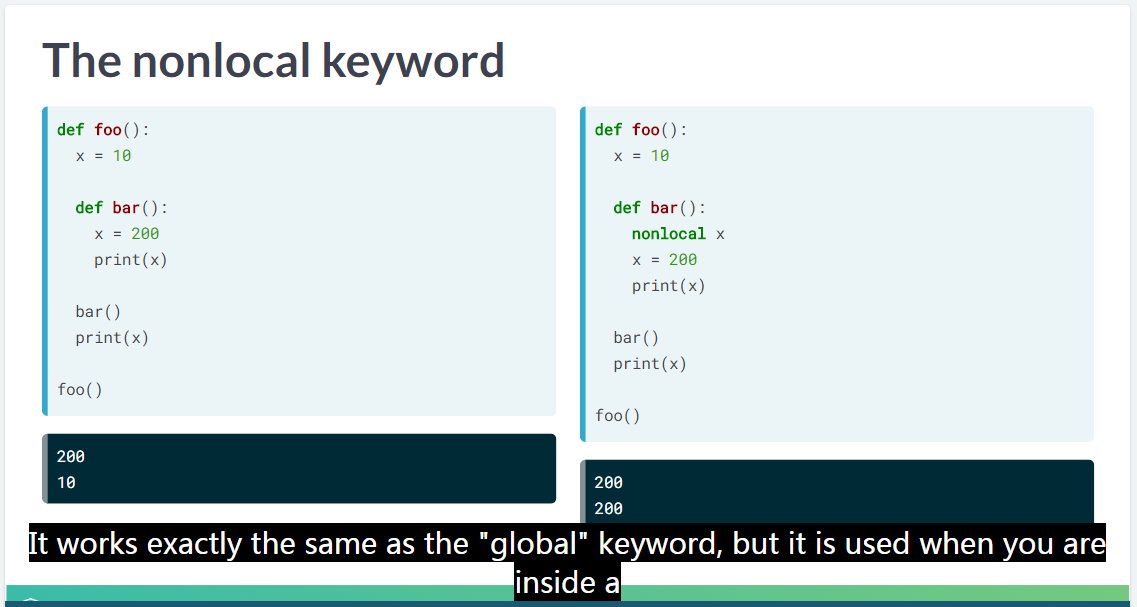
nonlocal 也是一个等价于 global 的东西。
x = 50

def one():
  x = 10

def two():
  global x
  x = 30

def three():
  x = 100
  print(x)

for func in [one, two, three]:
  func()
  print(x)
这是一个非常好理解 Python Scope 的例子。
one()doesn’t change the globalx, so the firstprint()statement prints 50.two()does change the globalxso the secondprint()statement prints 30. Theprint()statement inside the functionthree()is referencing thexvalue that islocaltothree(), so it prints100. Butthree()does not change the globalxvalue so the lastprint()statement prints 30 again. (Miel 2019)
注意中间 global 情况下的 x 被改写为 30 了。
5.2.1 global 的一个例子
5.2.2 nonlocal 的使用情况
def read_files():
  file_contents = None

  def save_contents(filename):
    # Add a keyword that lets us modify file_contents
    nonlocal file_contents
    if file_contents is None:
      file_contents = []
    with open(filename) as fin:
      file_contents.append(fin.read())

  for filename in ['1984.txt', 'MobyDick.txt', 'CatsEye.txt']:
    save_contents(filename)

  return file_contents

print('\n'.join(read_files()))
我觉得倒是用的挺常见的。
5.3 Closures
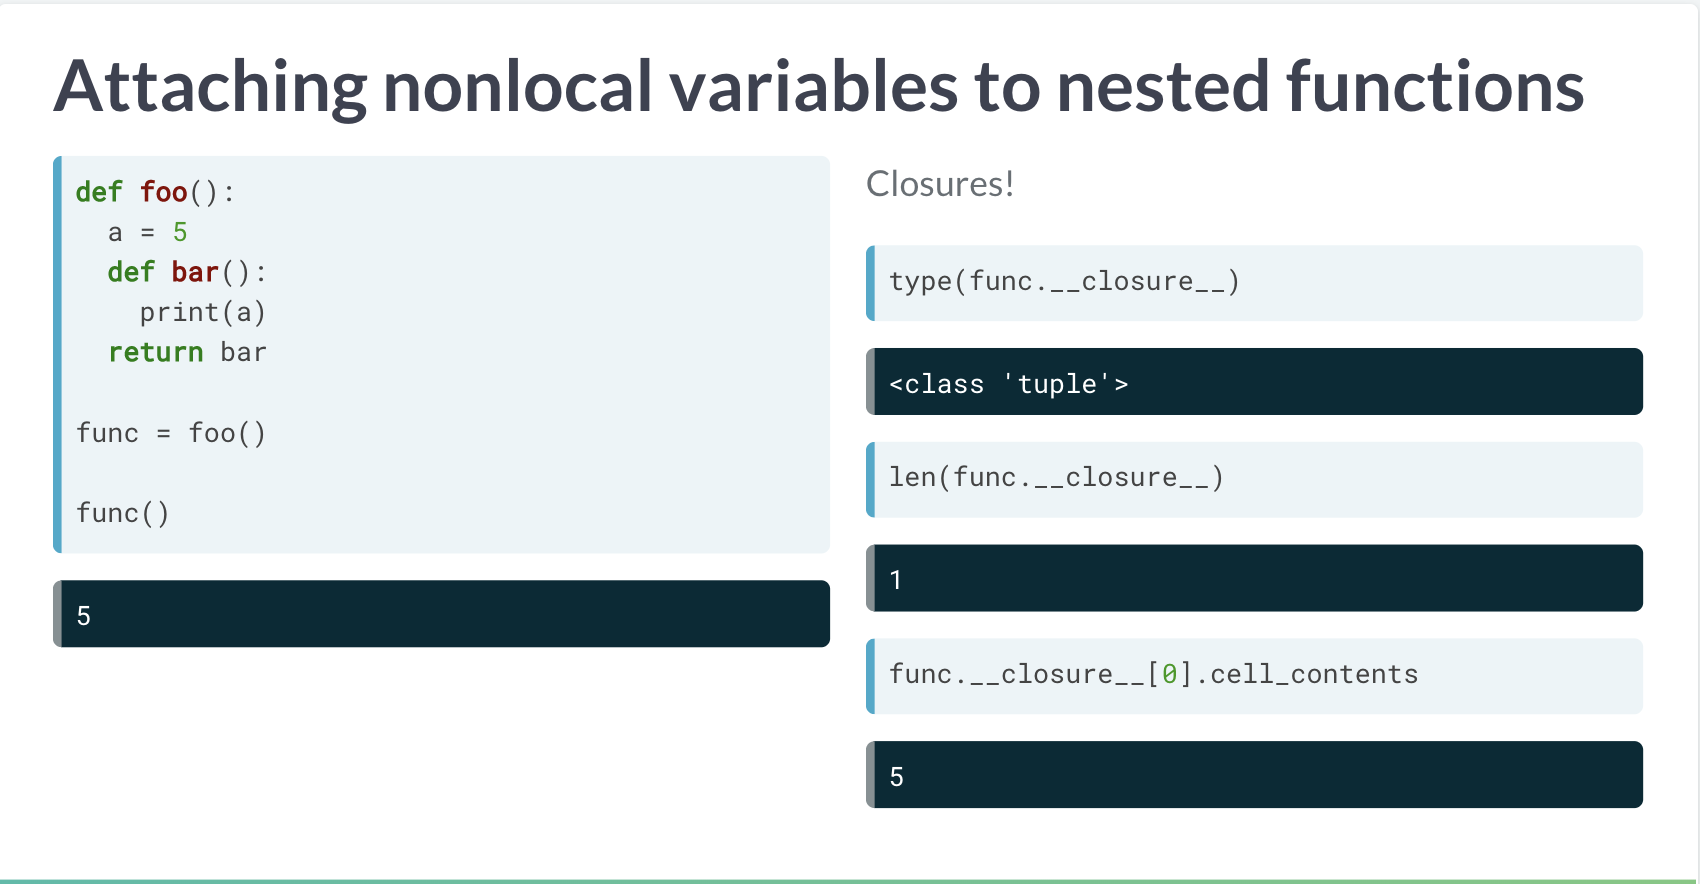
image
没有具体很明白。
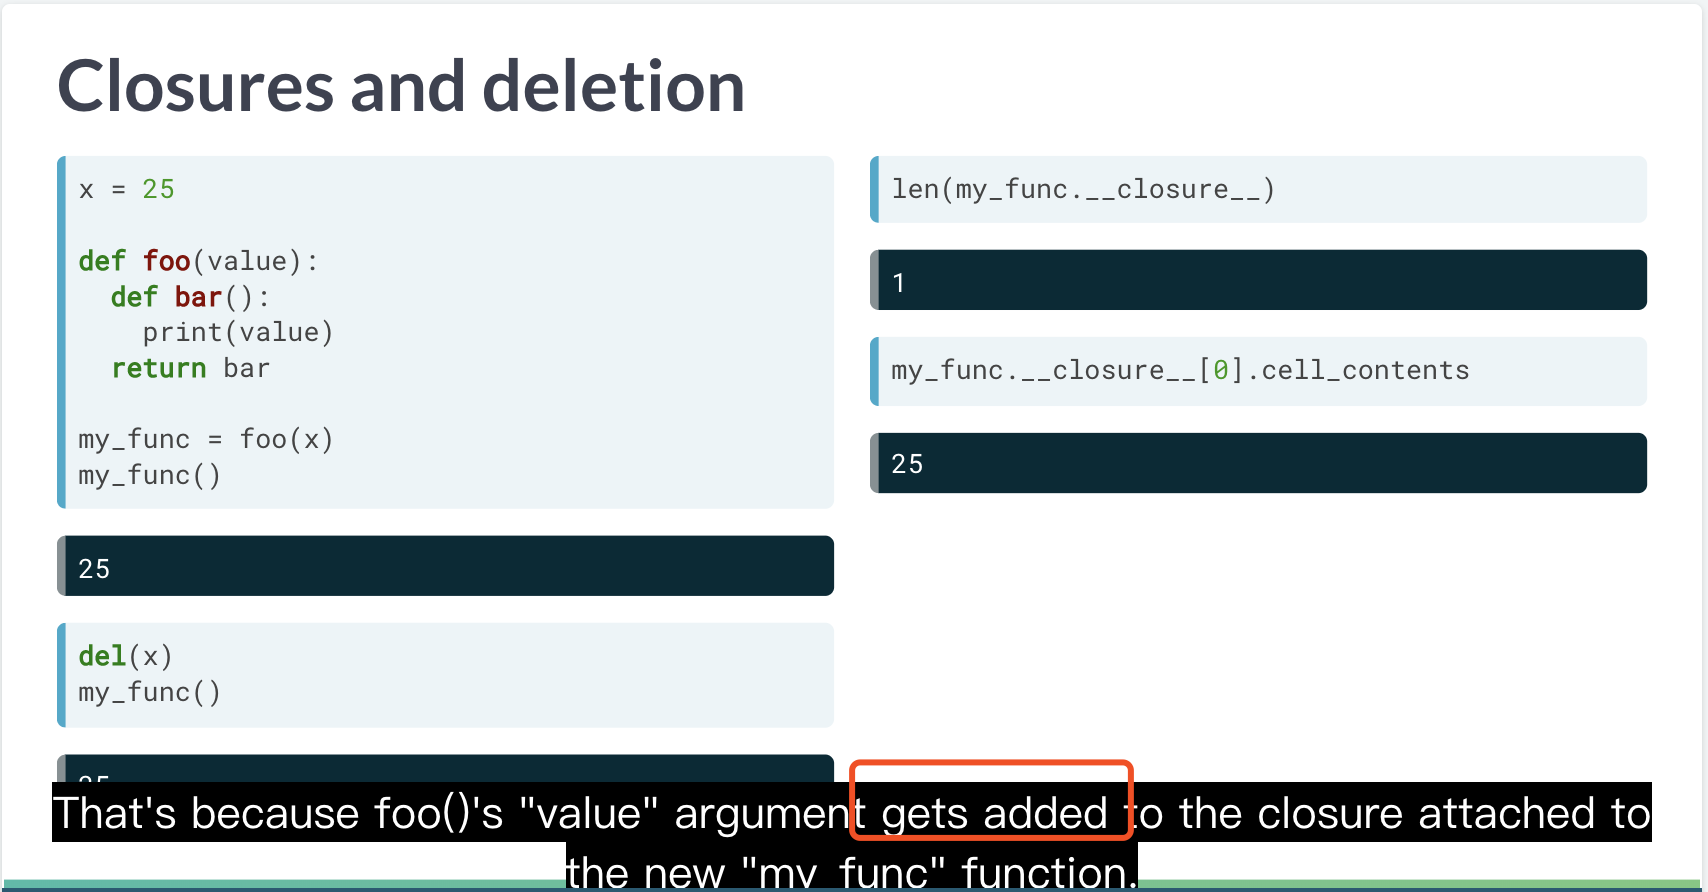
del = rm in R
Show her that all of the nonlocal variables she needs are in the new function’s closure. (Miel 2019)
nonlocal variables ~ new function’s closure
def return_a_func(arg1, arg2):
  def new_func():
    print('arg1 was {}'.format(arg1))
    print('arg2 was {}'.format(arg2))
  return new_func

my_func = return_a_func(2, 17)

print(my_func.__closure__ is not None)
print(len(my_func.__closure__) == 2)

# Get the values of the variables in the closure
closure_values = [
  my_func.__closure__[i].cell_contents for i in range(2)
]
print(closure_values == [2, 17])这是由 greedy child 决定的。global 的对象,在 local 里面一直可以被调用。 反向逻辑,local 找不到了,才会去 global 找嘛。
She has seen that you can modify, delete, or overwrite the values needed by the nested function, but the nested function can still access those values because they are stored safely in the function’s closure.
并且这种环境传递变量是复制的逻辑。
def my_special_function():
  print('You are running my_special_function()')

def get_new_func(func):
  def call_func():
    func()
  return call_func

new_func = get_new_func(my_special_function)

# Redefine my_special_function() to just print "hello"
def my_special_function():
  print("hello")

new_func()
def my_special_function():
print('You are running my_special_function()')
def get_new_func(func):
def call_func():
func()
return call_func
new_func = get_new_func(my_special_function)
# Delete my_special_function()
del(my_special_function)
new_func()def my_special_function():
print('You are running my_special_function()')
def get_new_func(func):
def call_func():
func()
return call_func
# Overwrite `my_special_function` with the new function
my_special_function = get_new_func(my_special_function)
my_special_function()结果都是
所以说 scope 和 closure 是放在一块解释的。
5.4 Decorators
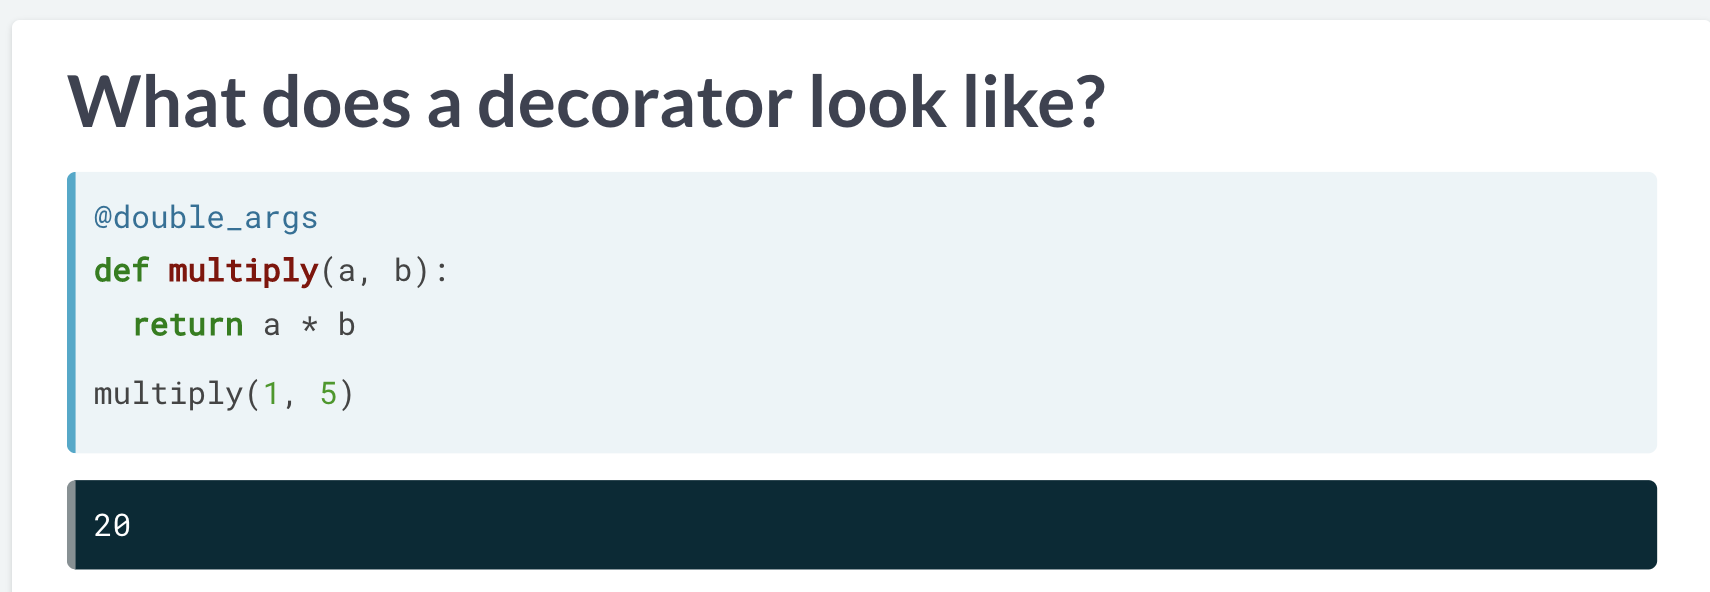
装饰器的写法
@开头,加上装饰器的名字。
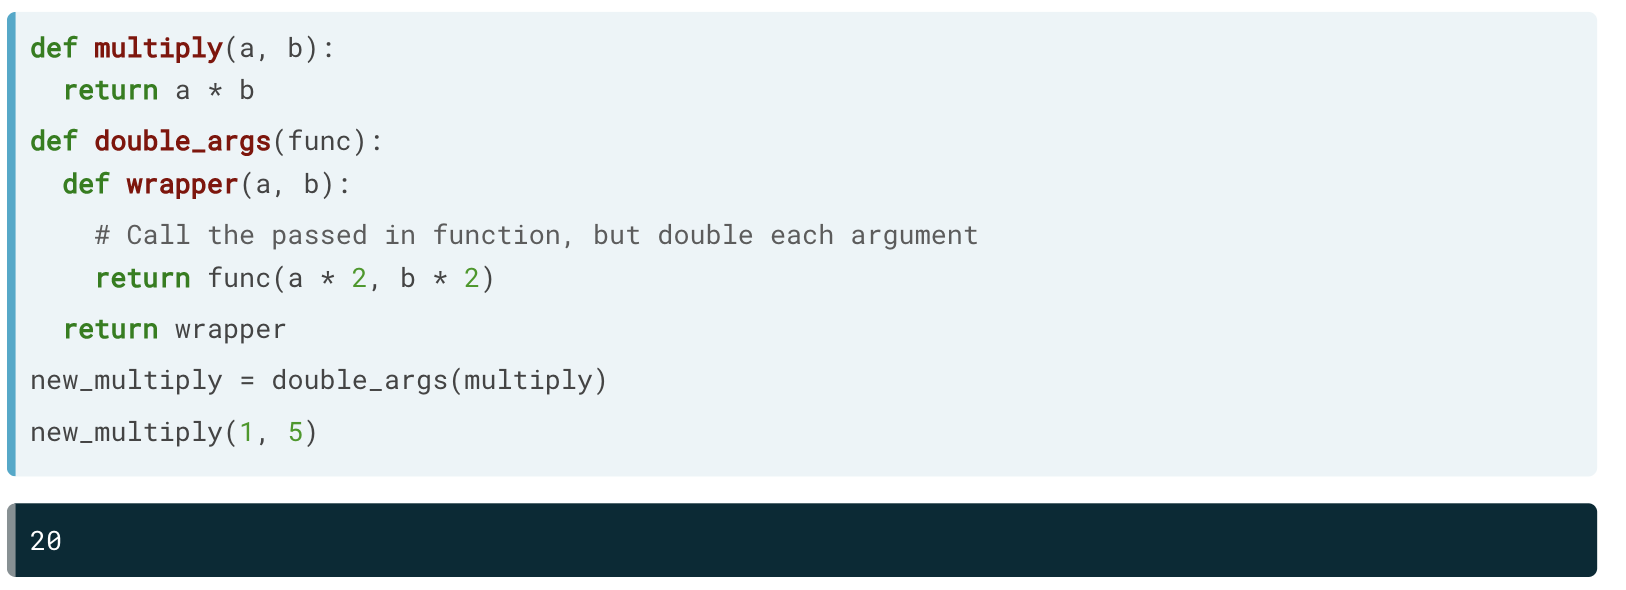
并且double_args 自定义的。
就是 a 和 b 都两倍的意思。

image
decorators are just functions that take a function. this function is an argument and return a modified version of that function. (Miel 2019)
Decorators 也是 函数。
在 func signature 上进行修改!
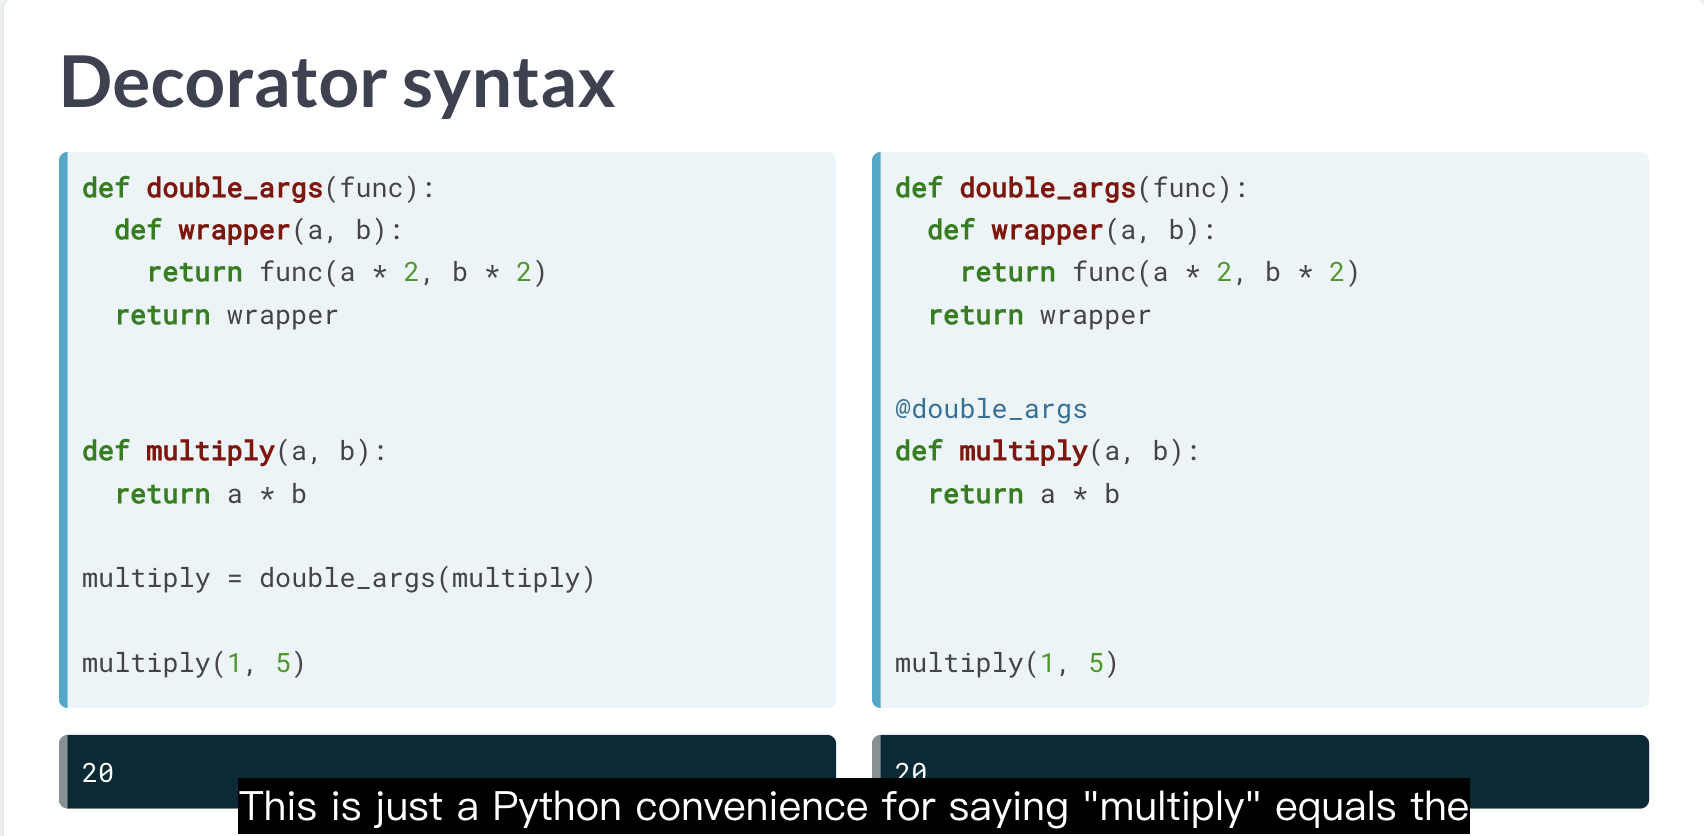
之前说装饰器就是 Python 的 函数,但是是一种特殊的函数,所以出现了特有的 syntax。
def print_args(func):
  sig = inspect.signature(func)
  def wrapper(*args, **kwargs):
    bound = sig.bind(*args, **kwargs).arguments
    str_args = ', '.join(['{}={}'.format(k, v) for k, v in bound.items()])
    print('{} was called with {}'.format(func.__name__, str_args))
    return func(*args, **kwargs)
  return wrapper
5.4.1 redefining function
5.4.2 decorator syntax
# Decorate my_function() with the print_args() decorator
@print_args
def my_function(a, b, c):
  print(a + b + c)

my_function(1, 2, 3)def print_before_and_after(func):
def wrapper(*args):
print('Before {}'.format(func.__name__))
# Call the function being decorated with *args
func(*args)
print('After {}'.format(func.__name__))
# Return the nested function
return wrapper
@print_before_and_after
def multiply(a, b):
print(a * b)
multiply(5, 10)6 装饰器的应用
6.1 real-world examples
6.1.1 time function
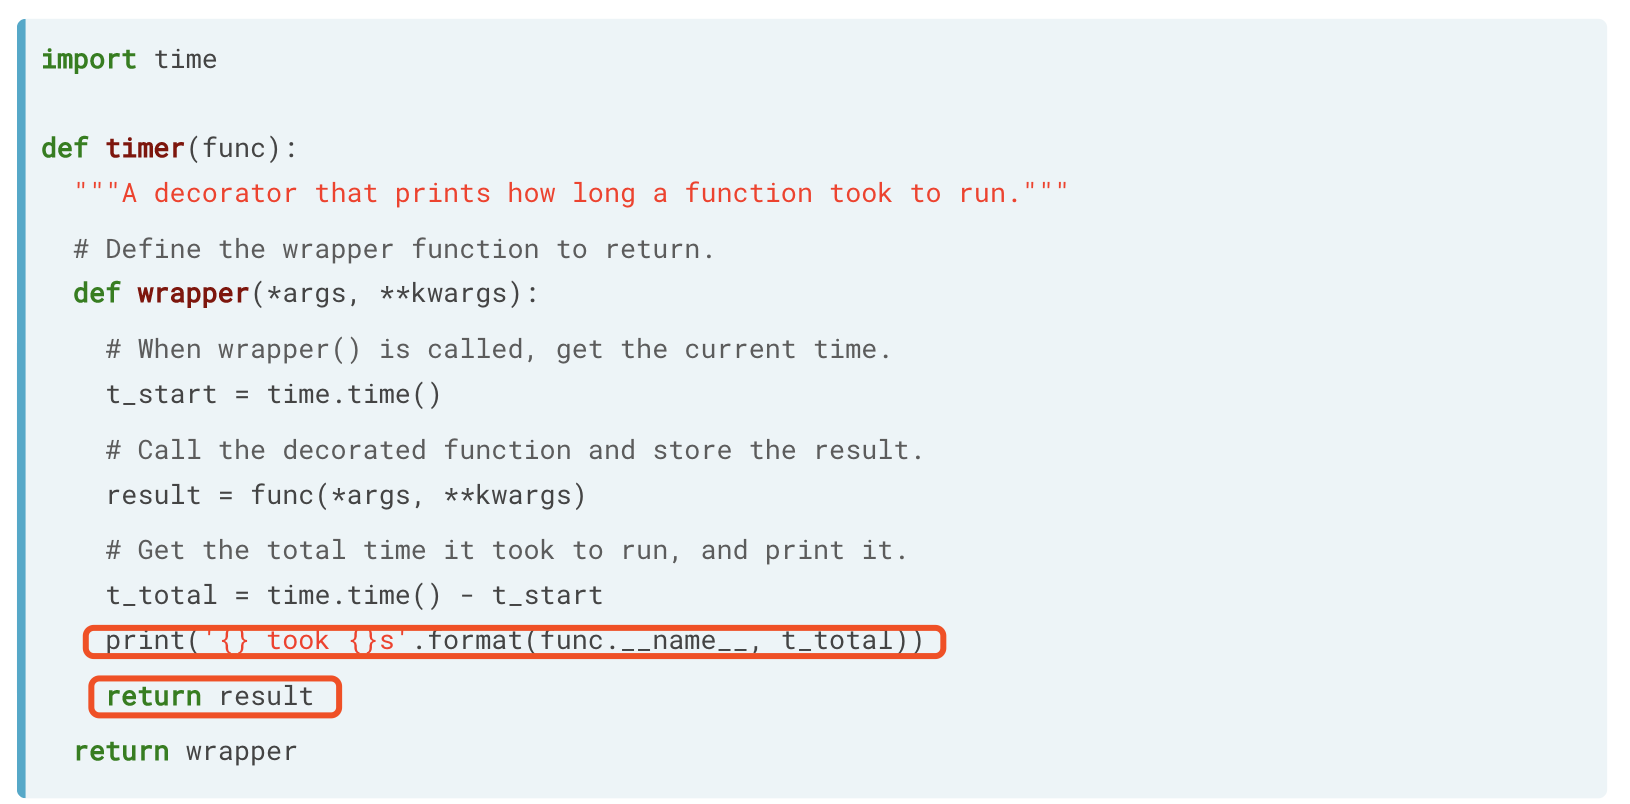
函数运行时间计算
这个装饰器,只是增加了print时间而已。

例子
6.1.2 cache
反馈的是字典格式。
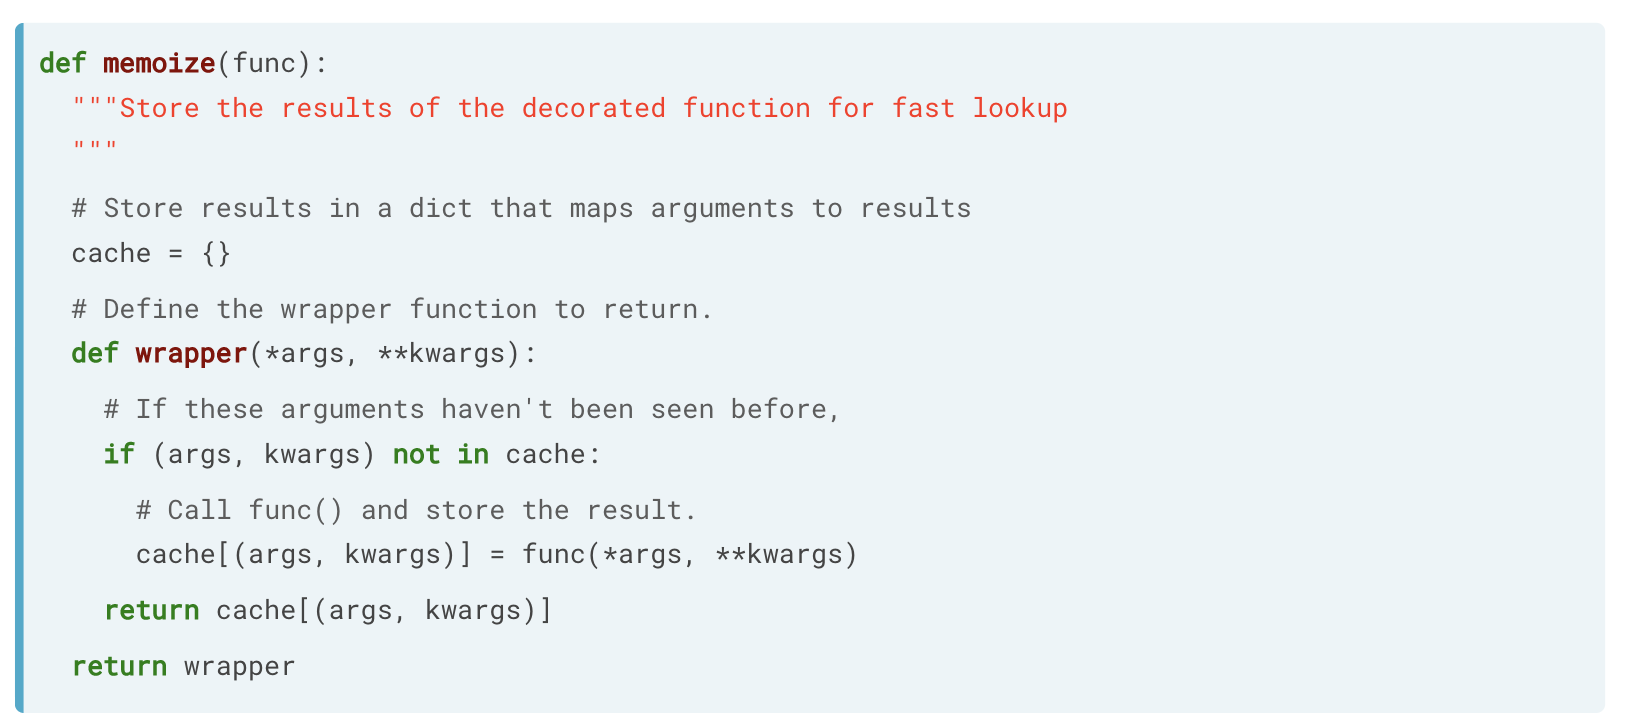
查看是否被重复调用
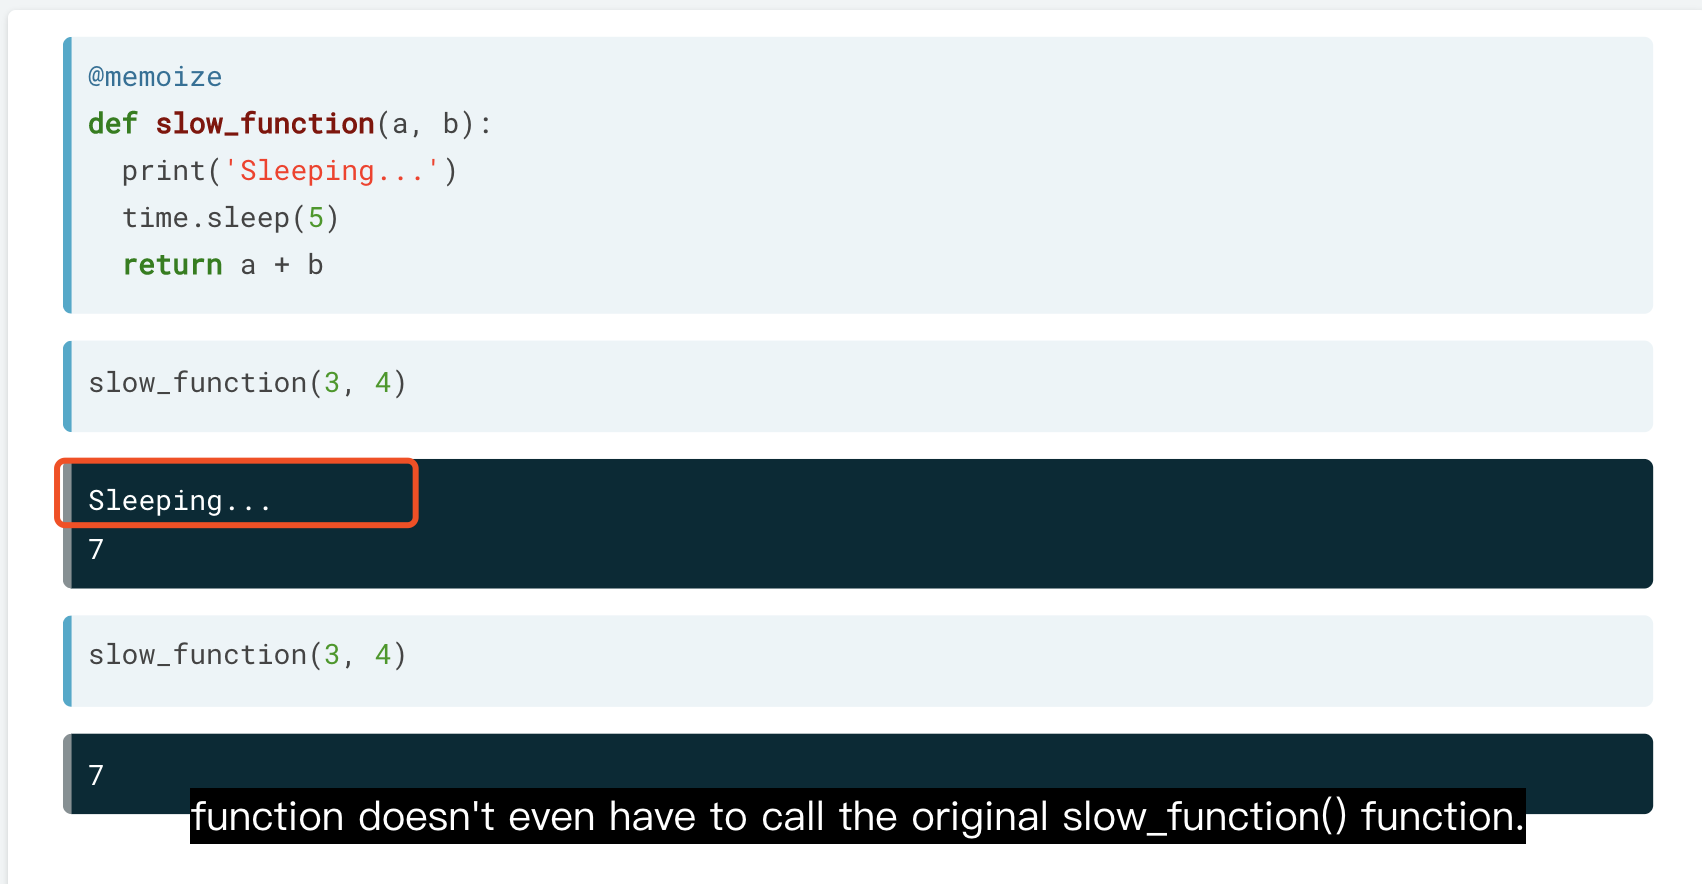
例子
如果曾经跑过,就不再会跑了,节约时间。
decorator 也体现了 DRY 的原则。因为这一功能是通过 tag 的方式加载到对应函数的。
查询每个函数的 return 对象的类型
def print_return_type(func):
  # Define wrapper(), the decorated function
  def wrapper(*args, **kargs):
    # Call the function being decorated
    result = func(*args, **kargs)
    print('{}() returned type {}'.format(
      func.__name__, type(result)
    ))
    return result
  # Return the decorated function
  return wrapper

@print_return_type
def foo(value):
  return value

print(foo(42))
print(foo([1, 2, 3]))
print(foo({'a': 42}))<script.py> output:
foo() returned type <class 'int'>
42
foo() returned type <class 'list'>
[1, 2, 3]
foo() returned type <class 'dict'>
{'a': 42}装饰器类似于 write_bottom_lines 在 R 包的作用。
def counter(func):
  def wrapper(*args, **kwargs):
    wrapper.count += 1
    # Call the function being decorated and return the result
    return wrapper.count
  wrapper.count = 0
  # Return the new decorated function
  return wrapper

# Decorate foo() with the counter() decorator
@counter
def foo():
  print('calling foo()')

foo()
foo()

print('foo() was called {} times.'.format(foo.count))
查询了函数被 call 多少次。
6.2 Decorators and metadata
One of the problems with decorators is that they obscure the docorated function’s metadata.
为什么是 metadata? 因为使用装饰器的时候,函数的 metadata 会被装饰器覆盖!

__name__ 和 __default__一致
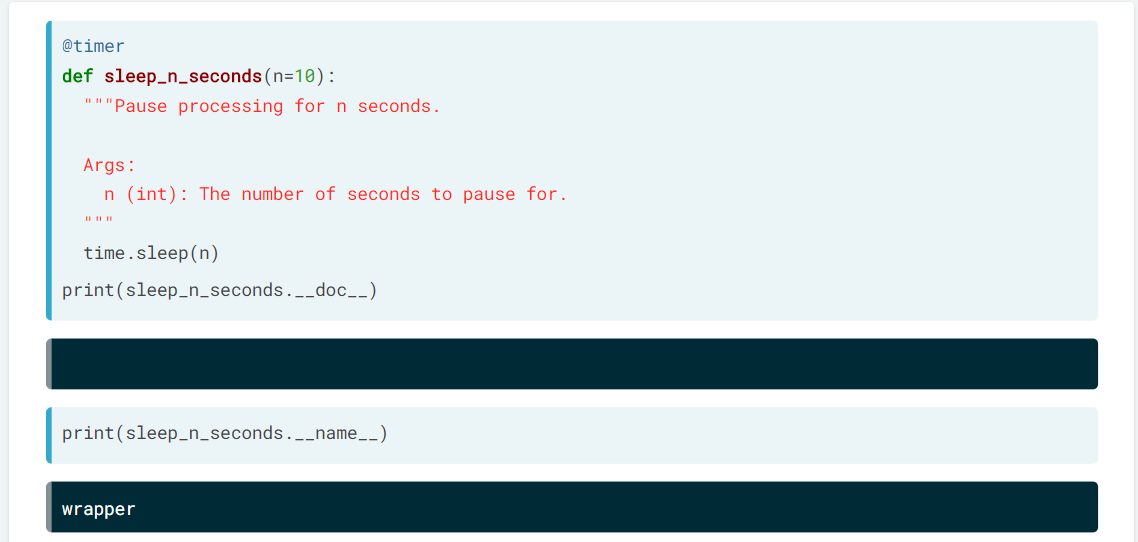
函数被覆盖了。
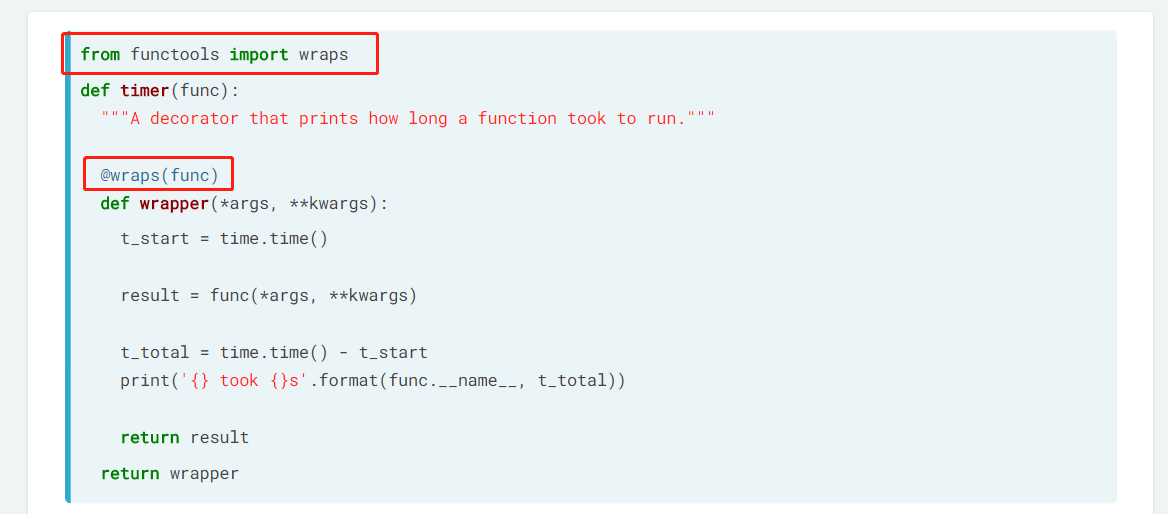
functools.wraps 可以解决这个问题
import functools 解决!
def add_hello(func):
  def wrapper(*args, **kwargs):
    print('Hello')
    return func(*args, **kwargs)
  return wrapper

# Decorate print_sum() with the add_hello() decorator
@add_hello
def print_sum(a, b):
  """Adds two numbers and prints the sum"""
  print(a + b)

print_sum(10, 20)
print(print_sum.__doc__)def add_hello(func):
# Add a docstring to wrapper
def wrapper(*args, **kwargs):
"""Print 'hello' and then call the decorated function."""
print('Hello')
return func(*args, **kwargs)
return wrapper
@add_hello
def print_sum(a, b):
"""Adds two numbers and prints the sum"""
print(a + b)
print_sum(10, 20)
print(print_sum.__doc__)# Import the function you need to fix the problem
from functools import wraps
def add_hello(func):
@wraps(func)
def wrapper(*args, **kwargs):
"""Print 'hello' and then call the decorated function."""
print('Hello')
return func(*args, **kwargs)
return wrapper
@add_hello
def print_sum(a, b):
"""Adds two numbers and prints the sum"""
print(a + b)
print_sum(10, 20)
print(print_sum.__doc__)
@check_everything
def duplicate(my_list):
  """Return a new list that repeats the input twice"""
  return my_list + my_list

t_start = time.time()
duplicated_list = duplicate(list(range(50)))
t_end = time.time()
decorated_time = t_end - t_start

t_start = time.time()
# Call the original function instead of the decorated one
duplicated_list = duplicate.__wrapped__(list(range(50)))
t_end = time.time()
undecorated_time = t_end - t_start

print('Decorated time: {:.5f}s'.format(decorated_time))
print('Undecorated time: {:.5f}s'.format(undecorated_time))
def check_everything(func):
@wraps(func)
def wrapper(*args, **kwargs):
check_inputs(*args, **kwargs)
result = func(*args, **kwargs)
check_outputs(result)
return result
return wrapper假设装饰器check_everything跑的很慢。
可以使用.__wrapped执行原有函数,和装饰过的函数进行时间对比!
6.3 Decorators that take arguments
使用嵌套函数使得装饰器可以使用参数。 所以这就是函数嵌套,nested func 的意义,如果装饰器需要参数的话! 这是可以理解的逻辑。 所以装饰器其实就是嵌套函数!并且不改变原来函数的名称!
def run_n_times(n):
  """Define and return a decorator"""
  def decorator(func):
    def wrapper(*args, **kwargs):
      for i in range(n):
        func(*args, **kwargs)
    return wrapper
  return decorator
# Make print_sum() run 10 times with the run_n_times() decorator
@run_n_times(10)
def print_sum(a, b):
print(a + b)
print_sum(15, 20)# Use run_n_times() to create the run_five_times() decorator
run_five_times = run_n_times(5)
@run_five_times
def print_sum(a, b):
print(a + b)
print_sum(4, 100)# Modify the print() function to always run 20 times
print = run_n_times(20)(print)
print('What is happening?!?!')所以我觉得装饰器其实相当于 purrr::safely 之类的函数啊,是 adv 结构的!
6.3.1 HTML Generator
def bold(func):
  @wraps(func)
  def wrapper(*args, **kwargs):
    msg = func(*args, **kwargs)
    return '<b>{}</b>'.format(msg)
  return wrapper
def italics(func):
  @wraps(func)
  def wrapper(*args, **kwargs):
    msg = func(*args, **kwargs)
    return '<i>{}</i>'.format(msg)
  return wrapper
html(open_tag, close_tag) 这是一个比较正常的主函数思路,我已经写到 add2md 中了。
def html(open_tag, close_tag):
  def decorator(func):
    @wraps(func)
    def wrapper(*args, **kwargs):
      msg = func(*args, **kwargs)
      return '{}{}{}'.format(open_tag, msg, close_tag)
    # Return the decorated function
    return wrapper
  # Return the decorator
  return decorator
# Make hello() return bolded text
@html("<b>", "</b>")
def hello(name):
return 'Hello {}!'.format(name)
print(hello('Alice'))注意整个 wrapper 都是先反馈函数的 return 作为对象后,再进行修改。
# Make goodbye() return italicized text
@html("<i>", "</i>")
def goodbye(name):
  return 'Goodbye {}.'.format(name)

print(goodbye('Alice'))
# Wrap the result of hello_goodbye() in <div> and </div>
@html("<div>", "</div>")
def hello_goodbye(name):
return '\n{}\n{}\n'.format(hello(name), goodbye(name))
print(hello_goodbye('Alice'))Hello Alice! Goodbye Alice.
6.4 Timeout(): a real world example
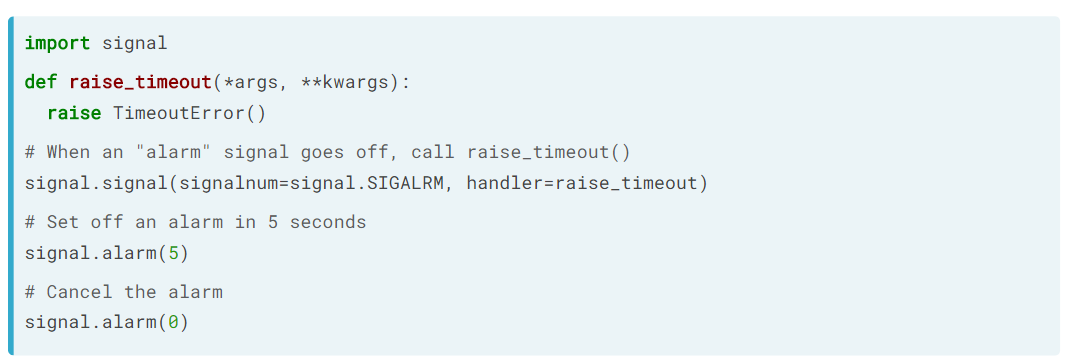
The
alarm()function lets us set an alarm for some number of seconds in the function. Passing0to thealarm()function cancels the alarm. (Miel 2019)
这种函数就应该杀掉。 0s 发出警报
alarm 函数使用
This ensures that the alarm eiter rings or gets canceled. (Miel 2019)
import signal
from functools import wraps
def timeout(n):
    def decorator(func):
        @wraps(func)
        def wrapper(*args, **kargs):
            signal.alarm(n)

            try:
                return func(*args, **kargs)

            finally:
                # cancel func
                alarm(0)
        return wrapper
    return decorator
import time
@timeout(5)
def foo():
time.sleep(10)
print("test the decorator timeout.")
foo()
@timeout(20)
def bar():
time.sleep(10)
print("test the decorator timeout.")
bar()timeout 这个函数很有用!
6.5 tagging
Tagging something means that you have given that thing one or more strings that act as labels. For instance, we often tag emails or photos so that we can search for them later. You’ve decided to write a decorator that will let you tag your functions with an arbitrary list of tags. You could use these tags for many things:
Labeling functions as “experimental” so that users know that the inputs and outputs might change in the future. Marking any functions that you plan to remove in a future version of the code. https://campus.datacamp.com/courses/writing-functions-in-python/more-on-decorators?ex=11
这是为什么 decorator 叫做 tag 的原因,的确就是标签!
05-01-ch4-tag.ipynb
For instance, you could tag a bunch of image transforming functions, and then write code that searches for all of the functions that transform images and apply them
Python’s flexibility around data types is usually cited as one of the benefits of the language. It can occasionally cause problems though if incorrect data types go unnoticed.
这部分 R 会做很多默认处理,但是不利于生产!
assert(condition) is a function that you can use to test whether something is true. If condition is True, this function doesn’t do anything. If condition is False, this function raises an error. The type of error that it raises is called an AssertionError.
又学习到建立包的一个函数表达!
05-02-ch4-returns_dict.ipynb
检验数据类型是不是 dict。
附录
6.6 context manager 常用符号
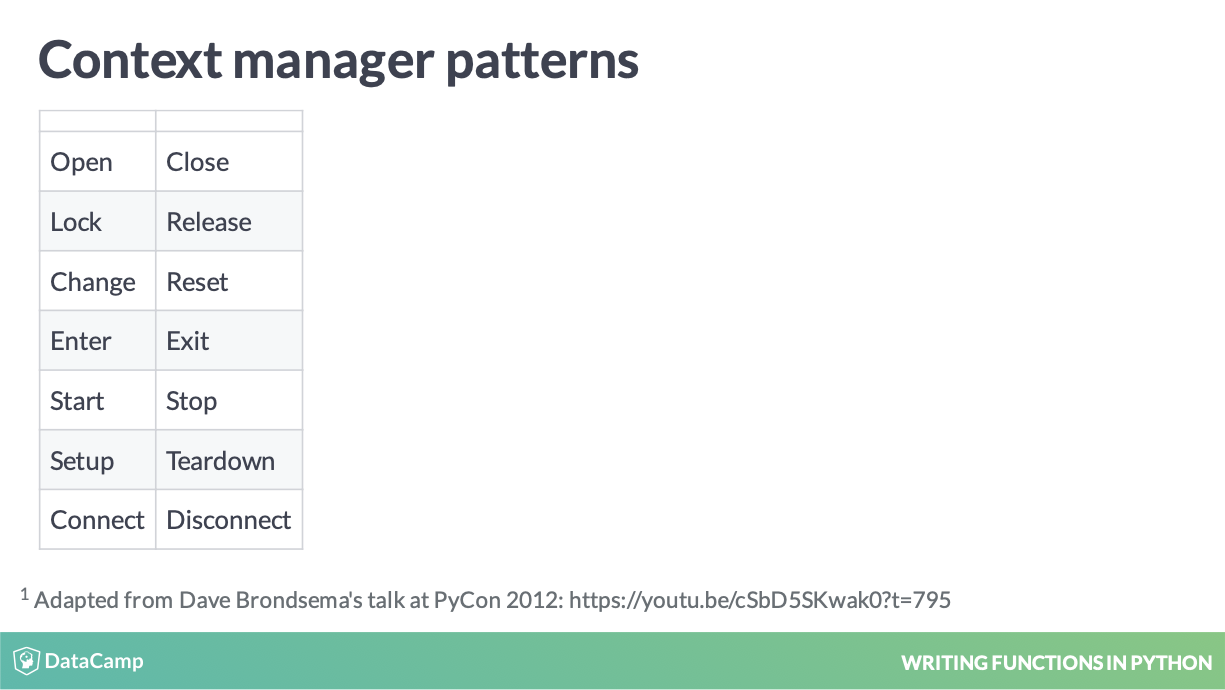
context manager 常用符号
6.7 条件语句
参考 李明江 and 张良均 (2019)
6.8 多级导入
参考 https://zhuanlan.zhihu.com/p/55682016
这导致后面我的文件不一定要存在某一个包里面,也就是公开项目。
sys.path.append Python 导入外部脚本
参考文献
Miel, Shayne. 2019. “Writing Functions in Python.” DataCamp. 2019. https://www.datacamp.com/courses/writing-functions-in-python.
李明江, and 张良均. 2019. “包教包会,7段代码带你玩转Python条件语句.” Python数据科学. 2019. https://mp.weixin.qq.com/s/fnDbNKme7LEf-wcTUocjhQ.